Quantcast
Channel: Scripting – FoxDeploy.com
Viewing all 90 articles
Browse latest View live

Part V – Building Responsive PowerShell Apps with Progress bars

$
0
0

series_PowerShellGUI

This post is part of the Learning GUI Toolmaking Series, here on FoxDeploy. Click the banner to return to the series jump page!


Where we left off

If you’ve followed this series, you should know how to make some really cool applications, using WPF for the front-end and PowerShell for the code-behind.

What will now probably happen is you’ll make a cool app and go to show it off to someone with a three letter title and they’ll do something you never imagined, like drag a CSV file into the text box….(true story).  Then this happens.

ISE_poop_the_bed

We don’t want this to happen.  We want our apps to stay responsive!

In this post we’ll be covering how to implement progress bars in your own application, and how to multi-thread your PowerShell applications so they don’t hang when background operations take place. The goal here is to ensure that our applications DON’T do this.

SayNo


Do you even thread, bro?

Here’s why this is happening to us…

if we are running all operations in the same thread, from rendering the UI to code behind tasks like waiting for something slow to finish, eventually our app will get stuck in the coding tasks, and the UI freezes while we’re waiting.  This is bad.

Windows will notice that we are not responding to the user’s needs and that we’re staying late at the office too often and put a nasty ‘Not Responding’ in the title. This is not to mention the passive-aggressive texts she will leave us!

If thing’s don’t improve, Windows will then gray out our whole application window to show the world what a bad boyfriend we are.

Should we still blunder ahead, ignoring the end user, Windows will publicly dump us, by displaying a ‘kill process’ dialog to the user.  Uh, I may have been transferring my emotions there a bit…

All of this makes our cool code look WAY less cool.

To keep this from happening and to make it easy, I’ve got a template available here which is pretty much plug-and-play for keeping your app responsive. And it has a progress bar too!

The full code is here PowerShell_GUI_template.ps1.  If you’d like the Visual Studio Solution to merge into your own project, that’s here.  Let’s work through what had to happen to support this.

 A little different, a lot the same

Starting at the top of the code, you’ll see something neat in these first few lines: we’re setting up a variable called $syncHash which allow us to interact with the separate threads of our app.

$Global:syncHash = [hashtable]::Synchronized(@{})
$newRunspace =[runspacefactory]::CreateRunspace()
$newRunspace.ApartmentState = "STA"
$newRunspace.ThreadOptions = "ReuseThread"
$newRunspace.Open()
$newRunspace.SessionStateProxy.SetVariable("syncHash",$syncHash)

After defining a synchronized variable, we then proceed to create a runspace for the first thread of our app.

  What’s a runspace?

This is a really good question.  A runspace is a stripped down instance of the PowerShell environment.  It basically tacks an additional thread onto your current PowerShell process, and away it goes.

Similar to a PowerShell Job, but they’re much, much quicker to spawn and execute.

However, where PSJobs are built-in and have tools like get-job and the like, nothing like that exists for runspaces. We have to do a bit of work to manage and control Runspaces, as you’ll see below.

Short version: a runspace is a super streamlined PowerShell tangent process with very quick spin up and spin down.  Great for scaling a wide task.

So, back to the code, we begin by defining a variable, $syncHash which will by synchonized from our local session to the runspace thread we’re about to make.  We then describe $newRunSpace, which will compartmentalize and pop-out the code for our app, letting it run on it’s own away from our session.  This will let us keep using the PowerShell or ISE window while our UI is running.  This is a big change from the way we were doing things before, which would lockup the PowerShell window while a UI was being displayed.

If we collapse the rest of the code, we’ll see this.
 
unnamed

The entire remainder of our code is going into this variable called $pscmd.  This big boy holds the whole script, and is the first thread which gets “popped out”.

The code ends on line 171, triggering this runspace to launch off into its own world with beginInvoke().  This allows our PowerShell window to be reused for other things, and puts the App in its own memory land, more or less.

Within the Runspace

Let’s look inside $pscmd to see what’s happening there.

unnamed (1)


Finally, something familiar!  Within $pscmd on lines 10-47, we begin with our XAML, laying out the UI.  Using this great tip from Boe, we have a new and nicer approach to scraping the XAML and search for everything with a name and mount it as a variable.

This time, instead of exposing the UI elements as $WPFControlName, we instead add them as members within $syncHash.  This means our Console can get to the values, and the UI can also reference them.  For example:

Synchash
Even though the UI is running in it’s own thread, I can still interact with it using this $syncHash variable from the console

Thread Count: Two and climbing

Now we’ve got the UI in it’s own memory land and thread…and we’re going to make another thread as well for our code to execute within.  In this next block of code, we use a coding structure Boe laid out to help us work across the many runspaces that can get created here.  Note that this time, our synchronized variable is called $jobs.

This code structure sets up an additional runspace to do memory management for us.

For the most part, we can leave this as a ‘blackbox’.  It is efficient and practical code which quietly runs for as long as our app is running.  This coding structure becomes invoked and then watchs for new runspaces being created.  When they are, it organizes them and tracks them to make sure that we are memory efficient and not sprawling threads all over the system.  I did not create this logic, by the way.  The heavy lifting has already been done for us, thanks to some excellent work by Joel Bennett and Boe Prox.

So we’re up to thread two.  Thread 1 contains all of our code, Thread 2 is within that and manages the other runspaces and jobs we’ll be doing.

Now, things should start to look a little more familiar as we finally see an event listener:

unnamed (2)


We’re finally interacting with the UI again.  on line 85, we register an event handler using the Add_Click() method and embed a scriptblock.  Within the button, we’ve got another runspace!

This multi threading is key though to making our app stay responsive like a good boyfriend and keep the app from hanging.

Updating the Progress Bar

When the button is clicked, we’re going to run the code in its own thread.  This is important, because the UI will still be rendered in its own thread, so if there is slowness off in ‘buttonland’, we don’t care, the UI will still stay fresh and responsive.

Now, this introduces a bit of a complication here.  Since we’ve got the UI components in their own thread, we can’t just reach over to them like we did in the previous example.  Imagine if we had a variable called $WPFTextBox.  Previously, we’d change the $WPFTextBox.Text member to change the text of the box.

However, if we try that now, we can see that we get an error because of a different owner.

differentowner
Exception setting Text The calling thread cannot access this object because a different thread owns it.

We actually created this problem for ourselves by pushing the UI into its own memory space. Have no fear, Boe is once again to the rescue here.  He created a function Called-Update window, which makes it easy to reach across threads.  (link)

The key to this structure is its usage of the Systems.Windows.Threading.Dispatcher class.  This nifty little guy appears when a threaded UI is created, and then sits, waiting  for update requests via its Invoke() method.  Simply provide the name of a control you’d like to change, and the updated value.


Function Update-Window {
        Param (
            $Control,
            $Property,
            $Value,
            [switch]$AppendContent
        )

        # This is kind of a hack, there may be a better way to do this
        If ($Property -eq "Close") {
            $syncHash.Window.Dispatcher.invoke([action]{$syncHash.Window.Close()},"Normal")
            Return
        }

        # This updates the control based on the parameters passed to the function
        $syncHash.$Control.Dispatcher.Invoke([action]{
            # This bit is only really meaningful for the TextBox control, which might be useful for logging progress steps
            If ($PSBoundParameters['AppendContent']) {
                $syncHash.$Control.AppendText($Value)
            } Else {
                $syncHash.$Control.$Property = $Value
            }
        }, "Normal")
    }

We’re defining this function within the button click’s runspace, since that is where we’ll be reaching back to the form to update values. When I load this function from within the console, look what I can do!

GIF_better
Enter a caption


With all of these tools in place, it is now very easy to update the progress bar as we progress through our logic.  In my case, I read a big file, sleep for a bit to indicate a slow operation, then update a text box, and away it goes.

If you’re looking to drag and drop some logic into your code, this is where you should put all of your slow operations.

Update-Window -Control StarttextBlock -Property ForeGround -Value White
start-sleep -Milliseconds 850
$x += 1..15000000 #intentionally slow operation
update-window -Control ProgressBar -Property Value -Value 25

update-window -Control TextBox -property text -value "Loaded File..." -AppendContent
Update-Window -Control ProcesstextBlock -Property ForeGround -Value White
start-sleep -Milliseconds 850
update-window -Control ProgressBar -Property Value -Value 50

Update-Window -Control FiltertextBlock -Property ForeGround -Value White
start-sleep -Milliseconds 500
update-window -Control ProgressBar -Property Value -Value 75

Update-Window -Control DonetextBlock -Property ForeGround -Value White
start-sleep -Milliseconds 200
update-window -Control ProgressBar -Property Value -Value 100

Sources

That’s all there is to it! The hard part here was containing our app into separate threads, but hopefully with the template involved you can easily see where to drop you XAML and how to make your application hum along swimmingly!

I could not have done this post without the many examples provided by Boe Prox on his blog:

Writing WPF Across Runspaces
PowerShell WPF Radio Buttons
Multi-runspace Event Handling
Asynchronous event handling in PowerShell

Additionally, I had help from Joel Bennett (JayKul) of HuddledMasses.org.

I learned a lot from reading over Micah Rairdon’s New-ProgressBar cmdlet from his blog, so check that out too.  Finally, Rhys W Edwards has a great cmdlet also on TechNet, with some more good demos if you’re looking for help or inspiration.


Use PowerShell to download video Streams

$
0
0

DownloadingVideoStreams

We live in an amazing world of on-demand video and always available bandwidth, where people can count on full reception at all times on their device.   If you want to watch cool videos from events or conferences, you can just load them on when you’re on the road with no issues, right?

Yeah right.

Streaming is cool and all, but there are times when it’s nice to have videos saved locally, like the huge backlog of content from MMS and TechEd.  However, a lot of streaming services want you to only view their videos within the confines of their web page, normally with a sign-in session.

In this post, I’ll show you a few ways to download videos you’ll run across online, and how you can use PowerShell to download some of the REALLY tricky ones.

How to do this on most platforms

If I need to save a video from YouTube or other sites like it, I go to KeepVid, first and foremost.

Google isn’t a fan of this site as they want you loading up YouTube and watching ads whenever you watch a video, so they try to dissuade you from entering the site. They do this by displaying this scary warning page if you browse to the site from a google search, but the site can be trusted, in my experience.

Scary
This message is FUD! it’s safe to use!

This is an easy to use website which uses Javascript to parse out the streaming behavior of a video and then presents you with a link to download your video in many different resolutions.

Options

This works for about 60% percent of sites on the web, but some use different streaming JavaScript platforms which try to obfuscate the video files.

How to manually save a video file using Chrome

If KeepVid doesn’t work, there is a way to do what it does manually.

I’ve been into Overwatch recently, and have been watching people play on Streamable.  Sometimes you see a really cool video and you want to save it,  like this one of this beast wiping out pretty much everyone in eight seconds.

Let’s fire up Chrome and hit F12 for the developer tools.  Click on the Network tab.

00

This will show us a waterfall view of elements on the page as they’re downloaded and being used.  We can even right click individual items to open them in a new tab.

Now, browse to the site with the video in question and click Play (if needed).  You need to trigger the video to begin playing for this to work.  Watch as all of the elements appear and look at the one with the longest line.  If it’s one giant long line, you’ve found a .mp4 or .ts file somewhere, which is the video was want to keep.

GIF

In this gif, my mouse wouldn’t appear but I let the site load, hit Play, and then click on the longest line in the timeline view on top. I then right click the item with the type ‘Media’ and here you can grab the file URL or open a new tab to this URL.  Do that and then you can save the video file.

This technique works for a LOT of the streaming videos on the Web and is especially good when your video won’t download using keepvid.

However, some sites use insidious methods to make it nearly impossible to save files. For them…

How to deal with the REALLY tricky ones

I have been all about learning Chef recently.  I see it as the evolution of what I do for a living, and I think in two or three years, I’ll be spending a lot of time in its kitchen.  So I’ve been consuming learning materials like a fiend.  I found this great video on demand session by Steven Murawski.

preview_1460658919

And I signed up for the presentation.  I watched the talk but was sad to see no link to download the video (which I would need, with no reception later that day). So I used the same Developer Tools trick I showed below and hopped into the tab, only to see this.

01

See how there are many different video files with an ascending number structure?  This site uses the JW player, similar to the platform used by Vimeo.  This is a clever streaming application, because it breaks apart files into 10 second snippets which it stitches together at playback.

Rather than one file to download, there are actually hundreds of them, so we’ll need to find an easy way to download them all.  I used the chrome developer trick to download one chunk and popped one of these mp2 files in VLC, and found that each snip was ~ 10 seconds long, and the video was an hour, so I’d need to download roughly 360 files.

Obviously I wasn’t about to do this by hand.

Figuring out the naming convention

If we look at the file URL, we see the video files seem to have this format:

02

If we could use some scripting tool to reproduce this naming convention, we could write a short script to keep downloading the chunks until we get an error.

Recreating the unique URLs isn’t too hard. We know that every file will begin with

video_1464285826-2_

then a five digit number, followed by

.ts

. We can test the first five chunks of the file with a simple

1..5

Put them all together to get:

foreach($i in 1..5) {"video_1464285826-2_$i.ts"}

Finally, to put the number in the right format, we just need to use $i.ToString(“00000”), which will render a 1 as 00001, for instance. Now to test in the console

download

Downloading the files

We can use PowerShell’s Invoke-WebRequest cmdlet to download a file.  Simply hand it the -URI you want to download, and specify an output path.

To use this, pick the destination for the file for line 1, and then for line 2, replace this with the baseURL of your video file.(If the file is http://www.foxdeploy.com/videos/demo1.mp4, then the baseurl would be http://www.foxdeploy.com/videos/).

$outdir = "c:\temp\VOD"
$baseUrl = "http://someserver.com/asset/video/"
cd $outdir
$i = 50
do {
 $url = "$baseUrl/video_1464285826-2_$($i.ToString("00000")).ts"
 Write-Host "downloading file $($i.ToString("00000"))..." -nonewline
 try { Invoke-WebRequest $url -OutFile "$outdir\$($i.ToString("00000")).ts" -PassThru -ErrorAction Stop | Tee-Object -Variable request | Out-Null}
 catch{
 write-warning 'File not found or other error'

 break
 }
 write-host "[OK]"
 Start-Sleep -Seconds 2
 $i++
 }
until ($request.StatusCode -ne 200)

After dropping in the right base URL and specifying your file naming convention, hit F5 and you should see the following.

GIF1

Joining the files back together

At this point we’ve got loads of files, but we need to combine or concatenate them.

This is possible through VLC, but Video LAN client will create timestamp errors (fast forward won’t work) if you use it. It’s better to re encode them.

To join the files, you’ll need FFMpeg.  Install it then run it from the start menu (which adds FFMpeg to your Path Environmental Variable, we need this later!).

Important! Open a new PowerShell prompt and try to launch ffmpeg

If it doesn’t work, copy ffmpeg into your C:\windows\system32 folder.

Assuming you need to merge a bunch of video files into one, just browse to the directory where you saved your files, and then run the following code.  Replace line 2 with the path to the source files (and the right extension), then on line 4, replace with the desired file name.

#replace with the location containing files to merge
$source = c:\temp\videos\*.ts

#destination file
$output = "$home\Video\output1.ts"

#this looks weird, but FFMpeg must have files in a pipe seperated list, very weird working with PowerSherll!
$files = (Get-ChildItem $outdir | select -expand Name ) -join '|'

#execute
ffmpeg -i "concat:$files" -c copy $output

Accepting Challenges

Have another bulk file download/management task you need to tackle with PowerShell?  Leave me a message and I’ll help you figure it out.


Cloning VMs in Hyper-V

$
0
0
It’s a common enough scenario: build one template machine and then mirror that to make a testlab, so you’d think this would be a built-in feature of Hyper-V, but its not.
Luckily, it’s not too hard to do once you know how, and I’ll guide you through the tough parts

Overall process

We’ll be following these steps to get clones of our master VM.
  • Create a source/master VM and install all common software and features on it
  • Prepare it for imaging using sysprep
  • Shutdown the source VM and remove it from Hyper-V
  • Create differencing disks using the Source VM’s VHD as the parent disk
  • Create new VMs, using the newly created differencing disk
Create a source VM

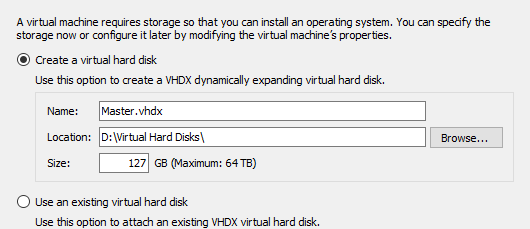
To begin, create a new VM and name its VHD something like master or template.  We’ll be building this one as the source for our VMs, and will eventually have to shut it down and never turn it back on again.  If we accidentally delete the VHD for it, or start it up again, we can make changes to it which will break all of our clones.

So make sure you give it a name that will remind you to not delete this guy!

master

Install Windows and whatever common apps you’ll want your source machine to use, and when you’ve got it to the point that you’re ready to copy it out…

Sysprep our VM

In our scenario here, we’ve built a source image and want to put it on other VMs.  Imagine if we wanted to push it down to multiple different laptops and desktops, however.  In that case, we’d need to ensure that all Hyper-V specific drivers and configurations are removed.  We also need Windows to run through the new user Out of Box Experience (OOBE), when Windows detects hardware and installs the right drivers, etc.

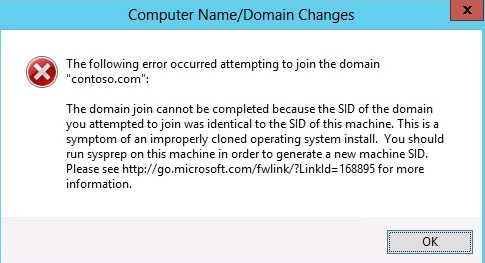
In the Windows world, particularly if machines are in an Active Directory Domain, you need to ensure that each machine has a globally unique identifier called a System Identifier, or SID.  This SID is created by Windows automatically during the OOBE process.  If you try joining two machines with the same SID to an AD Domain, you’ll get an error and it won’t be allowed, as a potential security risk.

duplicateSID

To avoid this, and because it’s a best practice, we’re gonna sysprep this badboy.

Also, I should note that there’s no going back.  Once we sysprep this machine, it will shutdown and we’re done with it.  If we turn it back on, we’re ‘unsealing’ the image and need to sysprep again.

How to sysprep a machine

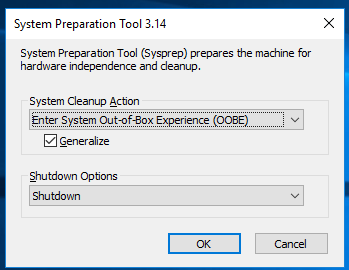
Once all of the software is installed, launch an administrative command prompt and browse to C:\windows\system32\sysprep.exe, and then select ‘Enter System Out of Box Experience’ and Generalize.  Under Shutdown Options, choose ‘Shutdown’

sysprep

When this completes, your VM will shutdown.

Shutdown and remove

At this point, remove the source VM from Hyper-V.  This will leave the files on disk, but delete the VM configuration.  You could leave the VM in place, just remember to never boot it again.  If you boot the parent vm, it will break the chain of differencing.

create differencing disks & create new vms

You could do this by hand in the console, or you could just run this PowerShell code.  Change line 2 $srcVHDPath to point to the directory containing your parent VHD.

Change line 4 $newVHDPath to point to where you want the new disk to go.  This will create a new Differencing VHD, based off of the parent disk.  This is awesome because we will only contain the changes to our image in the differencing disk.  This lets us scale up to having a LOT of VMs with a small, small amount of disk space.

Finally, change line 8 -Name NewName to be the name of a VM you’d like to create.

#Path to our source VHD
$srcVHDPath = "D:\Virtual Hard Disks\Master.vhdx"

#Path to create new VHDs
$newVHDPath = "D:\Virtual Hard Disks\ChildVM.vhdx"
New-VHD -Differencing -Path $newVHDPath -ParentPath $srcVHDPath

New-vm -Name "NewName" -MemoryStartupBytes 2048MB -VHDPath $newVHDPath

That’s all folks!
If you wanted to create five VMs, you’d just run this:
ForEach ($number in 1..5){
#Path to our source VHD
$srcVHDPath = "D:\Virtual Hard Disks\Master.vhdx"

#Path to create new VHDs
$newVHDPath = "D:\Virtual Hard Disks\ChildVM0$number.vhdx"
New-VHD -Differencing -Path $newVHDPath -ParentPath $srcVHDPath

New-vm -Name "ChildVM0$number" -MemoryStartupBytes 2048MB -VHDPath $newVHDPath
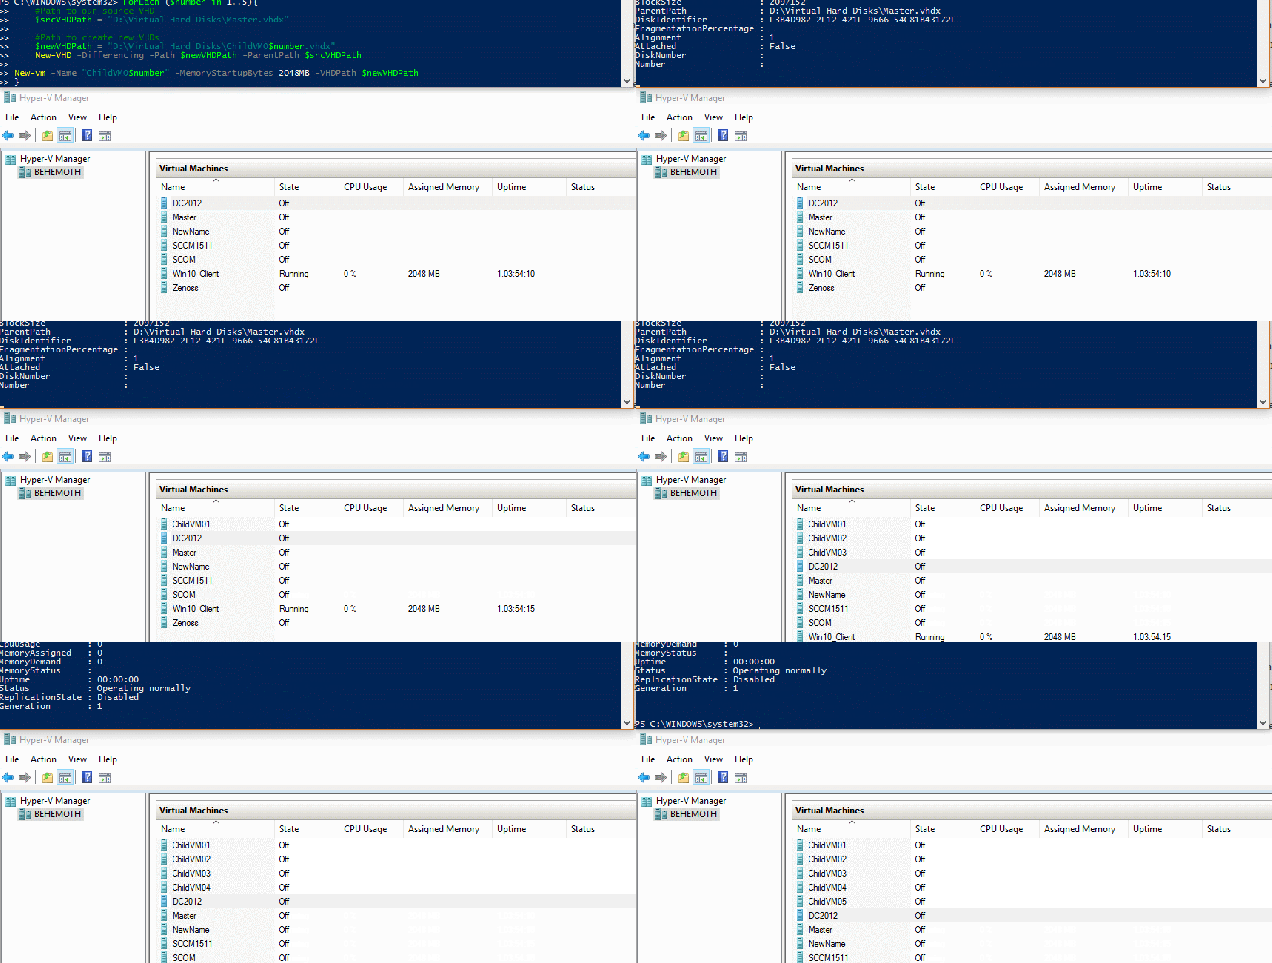
}
FiveVmsinFiveSecs
Let me know if this was helpful to you, and feel free to hit me up with any questions:)

Thinking about stateless applications

$
0
0

GOINGSTATELESS (1)


When I first looked into AWS and Azure, the notion of scaling out an application was COMPLETELY blowing my mind.  I didn’t get it, at all.  Like, for real, how would that even work?  A server without a persistent disk?

This short post is not going to tell you precisely how to do devops, or even give you pointers on how to build scaling apps in Azure and AWS.  No, instead, I’ll share an interesting conversation I had on reddit recently, and how I tried to explain the notion of stateless applications to someone with questions.

The initial question

q1
How is Docker different from Vagrant?

My reply

q2

Their follow-up

q3
Could you please provide an example of a stateless environment?

AWS is a great example of how you could setup a stateless application.

It’s easy to configure an application with a load balancer. We can use the load balancer to gauge how many people are trying to hit our site at a given time. If traffic exceeds the capacity of one host, we can tell our web service to add another host to share the load.

These new workers are just here to help us with traffic and keep our app responsive and fast. They will probably be instructed to pull down the newest source code on first boot, and be configured not to save any files locally. Instead, they’ll probably get a shared drive, pooled among all of the other workers.

Since they’re not saving files locally, we really don’t care about the host machine. As long as users have completed their session, it can die at any point. This is what it means to be stateless.

The workers make their mark on the world by committing permanent changes to a DB or shared drive.

So, new worker bees come online as needed. They don’t need to be permanently online though, and don’t need to preserve their history, so in that sense they are stateless. After the load drops, the unneeded little workers save their changes, and then go to sleep until needed again in the future.

Actually they’re deleted but I always feel sad thinking about my workers dying or being killed, so I have to think about it in different terms

Just my take on how I think of designing and deploying a stateless application. What do you think?  Did I get it wrong?


SCCM 1602 nightmare upgrade

$
0
0

This week, we had a scary ConfigMgr 1602 upgrade.

Of course, as a consultant you have to be cool like a fighter pilot in the face of adversity, as crying is frowned upon by customers when they see your hourly rate.  So when everything falls over, and there are spiders coming out of the air conditioner, you say ‘hmm, that’s strange’ and then whip out your laptop to begin opening log files like a fiend.

It was a day like any other

Before the upgrade, I ran through a practice run on my test lab domain, to try to prepare myself. We then used Kubisys to mirror our production SCCM and ran /TestDbUpgrade. All good.

However during the install we saw the install hang for a long time trying to stop sccm services.

Note :We saw this before with this same instance of SCCM when we upgraded to 1511; the install froze for an hour trying to stop the services. At that time, we manually stopped the SMS exec service and component Manger and the install proceeded.

So when the install froze again, we gave it ten minutes before manually stopping the SMS exec service. Install proceeded like normally and all looked fine in the logs until we tried to open the console.

ohno01
Configuration Manager cannot connect to the site

When I see errors like this, I immediately thing SMS Provider.

What’s the SMS Provider?
Good question!  While we tend to think SQL when we think SCCM, in reality ConfigMgr really stores a lot of information in the WMI repository on the Primary sites and the CAS.  Additionally, WMI plays a role in how data is stored in the SQL Database for ConfigMgr as well.

The SMS Provider is critical for allowing this interaction between the SCCM Console, WMI and SQL.  If you don’t have any working SMS Providers you can’t use the ConfigMgr console!


So we knew the SMS provider (which does a bunch of WMI stuff) likely couldn’t be reached, so I opened up the primary sites SMSProvider log \primary\SMS_SiteCode\logs\SMSProv.log and check out this nasty looking message!


ohno02
Relevant piece: Failed with error “WBEM_E_SHUTTING_DOWN”

Huh, that don’t look good.  Even though my install of SCCM Completed, WMI was shutting down, so far as the SMS Provider was concerned?  Huh….

I wanted to see how WMI was doing, so I tired running a few WMI queries with PowerShell, and all errored out.  So I checked out Services.msc and sure enough, the WMI Service was in the ‘stopping’ state.

ohno03

I tried my normal tricks, like looking up the process for this service in task manager, then killing the process.

the ultimate trick up my sleeve, manually killing processes for services

But even this failed, giving me an error of ‘process not in valid state’, which was really weird.

We tried to reboot the machine as a final effort, but it hung forever at shutting down, probably because of the issue with WMI.  With WMI stuck in this state of ‘Stopping’, SCCM could never commit its final write operations, so the services wouldn’t stop ever.

We had to go big…rebooting the VM via vSphere.

Seriously that’s all you did, reboot it?

Yeah, kind of an unsatisfying ending, I’ll admit, but everything was operating swimmingly after the reboot!


Enabling PowerShell Event Logging

$
0
0

Powershell logging

For one of my customers, we tried to enable PowerShell Module logging for ‘Over the shoulder’ event logging of all PowerShell commands.  We were doing this and enabling WinRM with HTTPs to help secure the company as we looked to extend the capabilities of PowerShell Remoting throughout the environment.  However, when we tried to enable the Group Policy Setting, it was missing in the GPMC!

In this post, we’ll walk through why you might want to do this, and what to do if you don’t see the settings for PowerShell Module Logging.

What is PowerShell Module logging?

PowerShell module logging allows you to specify which modules you’d like to log via a Group Policy or regkey, as seen in this wonderful write-up (PowerShell <3’s the blue team).

It allows us to get an ‘over-the-shoulder’ view, complete with variable expansion for every command a user runs in PowerShell.  It’s really awesome.  You can check the Event Log on a machine and see the results and all attempted PowerShell commands run by users.  If you then use SCOM or Splunk, you can snort these up and aggregate results from the whole environment and really track who is trying to do what across your environment.

PowerShell remoting

We loved it and wanted to turn it on, but when we opened the GPMC..

missin
Options should appear here under Computer \ Admin Template\Windows Components\Windows PowerShell

We were missing the options!

Enabling options for PowerShell Module and Event Logging

This is because the machine I was running this from was a Server 2008 machine, and these features were delivered with Group Policy in Server 2012 / Windows 8.1.  2008

The fix is simply to download the Windows 8.1 & Server 2012 ADMX files.

Install the missing ADMX templates

Note: These only need to be installed on one machine in the environment, the one from which you are writing Group Policy.

When you run the installer, copy the file path when you install the files.  The installer does not import them for you, but simply dumps them to a folder on this system.

File path

Find the appropriate ADMX file

Next, we can look into the .ADMX files on disk to see which one contains our settings. Since I knew the setting was called ‘Enable Module Logging’ or something like that, I just used PowerShell’s Select-String cmdlet to search all the files for the one that contained the right setting.  We’re able to do this because ADMX files are simply paths to Registry Keys and some XML to describe to the end user what these keys control.

Gross Oversimplification Warning: Really that’s all that Group Policy is in the first place: a front-end that allows us to specify settings which are just Regkeys, which get locked down so the end user can’t change them.

PS C:\ $definition =&quot;C:\Program Files (x86)\Microsoft Group Policy\Windows 8.1-Windows Server 2012 R2\PolicyDefinitions&quot;
PS C:\ dir $definition | select-string &quot;EnableModule&quot; | select Filename

finding the file

This tells us the file we need is ‘PowerShellExecutionPolicy.admx’. I then opened it in Visual Studio Code to see if it was the right file.
find our policy

This was the file!

Warning: Make sure you find the matching ADML file, which is in the appropriate nested folder.  For instance, if you speak english, you’ll need the \PolicyDefinitions\en-us\PowerShellExecutionPolicy.adml file too.

Failure to copy the ADML will result in strangeness in the GPMC, and the policies might not appear.

Copying the files

We now just need to copy the ADMX and the matching ADML file, which will be found in the appropriate language folder.

Copy these to ‘%systemroot%\PolicyDefinitions’, and be sure to move the .ADML file into the ‘en-us’ folder.  You should overwrite the original files.  If you can’t, delete the originals and then copy the new ones in.

Copy the template
I had to take ownership of the original files, then give myself full control permissions.  After that, I was able to overwrite the files.

Reload the GPMC

The final step is to completely close the Group Policy Management Editor and Management Console.  Then reload it and browse back down to Computer \ Admin Template\Windows Components\Windows PowerShell.  While these settings also exist under User Settings, those are a relic of PowerShell development and are ignored.

options exist!

Event correlation

I’ve been asked this question before.  If you’re wondering which GPO causes which event, see this chart.

evennts

References

Thanks to this article here for the refresher on importing 2012 Admin Templates onto a 2008 machine.


Safely storing credentials and other things with PowerShell

$
0
0

storing Credentials

Hey guys,

This post is mostly going to be me sharing an answer I wrote on StackOverflow, about a technique I use in my PowerShell modules on Github to safely store credentials, and things like REST Credentials.  This is something I’ve had on my blogging ‘To-Do’ list in OneNote for a while now, so it feels nice to get it written out.

I hope you like it, feel free to comment if you think I’m wrong!

The Original Question

I currently have a project in powershell which interacts with a REST API, and the first step after opening a new powershell session is to authenticate myself which creates a websession object which is then used for subsequent API calls. I was wondering what the best way of going about storing this token object across all Powershell sessions, because right now if I authenticate myself and then close & reopen powershell I need to re-authenticate which is rather inconvenient. I would like the ability to in theory authenticate once and then whenever I open up powershell be able to use my already saved websession object. At the moment I store this websession object in $MyInvocation.MyCommand.Module.PrivateData.Session
Original Question

My Take on Safely Storing objects on a machine with PowerShell

Since I’ve written a number of PowerShell Modules which interact with REST APIs on the web, I’ve had to tackle this problem before. The technique I liked to use involves storing the object within the user’s local credential store, as seen in my PSReddit PowerShell Module.

First, to export your password in an encrypted state. We need to do this using both the ConvertTo and ConvertFrom cmdlets.

Why both cmdlets?

ConvertTo-SecureString makes our plaintext into an Encrypted Object, but we can’t export that. We then use ConvertFrom-SecureString to turn the encrypted object back into encrypted text, which we can export.

I’m going to start with my very secure password of ham.

$password = "ham"
$password | ConvertTo-SecureString -AsPlainText -Force |
  ConvertFrom-SecureString | Export-CliXML $Mypath\Export.ps1xml

At this point, I’ve got a file on disk which is encrypted. If someone logs on to the machine they can’t decrypt it, only I can. If someone copies it off of the machine, they still can’t decrypt it. Only me, only here.

How do we decrypt the text?

Now, assuming we want to get the same plain text back out to use late, we can add this to our PowerShell Profile, you can import your password like so.

$pass = Import-CliXML $Mypath\Export.ps1xml | ConvertTo-SecureString
Get-DecryptedValue -inputObj $pass -name password

$password
>"ham"

This will create a variable called $password containing your password. The decryption depends on this function, so be sure it’s in your profile: Get-DecryptedValue.

Function Get-DecryptedValue{ param($inputObj,$name) $Ptr = [System.Runtime.InteropServices.Marshal]::SecureStringToCoTaskMemUnicode($inputObj) $result = [System.Runtime.InteropServices.Marshal]::PtrToStringUni($Ptr) [System.Runtime.InteropServices.Marshal]::ZeroFreeCoTaskMemUnicode($Ptr) New-Variable -Scope Global -Name $name -Value $result -PassThru -Force }

And that's it! If anyone knows who originally wrote the Get-DecryptedValue cmdlet, let me know in the comments and I'll give them full credit!


Coming to Ignite? Come to my session! 

$
0
0

I am deeply humbled (and a bit scared) to be invited to deliver a session at Microsoft Ignite this year! 

I’ll be delivering the HubTalk for the topic of ‘Intro to PowerShell’ this year! By far my biggest audience yet, I’m super excited! 

If you are coming to Ignite, please sign up for my session, link is here

I’ll be working on my slides for the next six weeks, so some of my posts might be a bit delayed. 

If you are coming to Ignite, please come heckle me and win swag. If possible, immediately sidetrack the discussion into the weeds on some minor issue while I grossly over simplify everything. :p

Wish me luck! 


OP-ED: Why PowerShell on Linux is good for EVERYONE and how to begin

$
0
0

POWERSHELLonlinux

Sounds impossible, huh?

Ever since the beginning of the Monad project, in which Microsoft attempted to bring the same rich toolbox of Piped commands that Linux has enjoyed for ages, Microsoft enthusiasts have been clamoring for confirmation of PowerShell on Linux.  But it forever seemed a pipedream.

Then, in February of 2015, Microsoft announced that the CORE CLR (Common Language Runtime) was made open source and available on Linux.  As the Core CLR is the “the .NET execution engine in .NET Core, performing functions such as garbage collection and compilation to machine code”, this seemed to imply that PowerShell might be possible on Linux someday.

To further fan the fires of  everyone’s excitement, the creator of PowerShell, Jeffrey Snover–a self-proclaimed fan of the Bash shell experience in Linux– has been dropping hints of a unified management experience ALL OVER THE PLACE in the last year too.

And now today with this article, Microsoft released it to the world.  Also, here’s a great YouTube video about it too.

Available now on OSX, Debian and Ubuntu, PowerShell on Linux is here and it is awesome!

Get it here if you can’t wait, or read ahead to see why I’m so excited about this!

Why is this great news for us Windows folks?

For we PowerShell experts, our management capabilities have just greatly expanded. Update those resumes, folks.

This means that the majority of our scripts?  They’ll just work in a Linux environment.  Have to hop on Linux machines from time-to-time?  PowerShell already used Linux aliases, which limited the friction of hopping between OSes but now we can write a script once and generally be able to assume that it will work anywhere.

I did say GENERALLY

With PowerShell on Linux we will not have WMI or CIM.  Furthermore, we’ll be enacting system changes mostly by tweaking files instead of using Windows APIs and methods to do things (which honestly was kind of the harder way to do it anyway).  And there’s no Internet Explorer COM object or a bunch of other crutches we might have used.

But a lot of things just work.

So this is great news for us!  Linux is a vastly different OS than Windows but I encourage you to start trying today.  Since you already know PowerShell, you’ll find it that much easier to interact with the OS now.

What does this mean for the Linux community?

This is good news for Linux fans as well.  We Microsofties and Enthusiasts are not coming to drink anybodies milk shake.  The Bourne Again Shell is NOT dead, and we’re not trying to replace it with PowerShell!

If anything this will signal the dawn of a new era, as loads of skilled Windows devs and operators will now be trying their hands at Linux.  Some of these will inevitably be the type to tinker with things, and will likely result in a new wave of energy and excitement around Linux.

The age of collaboration?  It’s just getting started.  The Power to write scripts and run them on any platform, and to bring the giant crowd of PowerShellers out into Mac and Linux can only mean good things for everyone.

Just like Bash on Windows, PowerShell on Linux is a GOOD thing, people.  Those who think it’s anything but are completely missing the point.

Developing on any platform

It also frees us up for all sorts of development scenarios.  You don’t NEED a Windows OS anymore, as you can write your code on an Ubuntu or OS X machine.

Similarly, you can use Bash on Windows to write shell code to execute on your Linux Machines.  Or write PowerShell code instead.

No longer are you stuck on the platform you want to execute on.

How do I get started?

Getting started is very easy.  First, spin up a VM in Azure, AWS or Hyper-V and install Ubuntu or CentOS.  Or do this on your Mac if you’re on Capitan.

Now simply follow the instructions for the platform below:

Platform Downloads How to Install
Windows .msi Instructions
Ubuntu 14.04 .deb Instructions
Ubuntu 16.04 .deb Instructions
CentOS 7 .rpm Instructions
OS X 10.11 .pkg Instructions

Once the install is completed type ‘PowerShell’ from the bash shell and away you go.  Right out of the gate you’ll have full intellisense and loads of core PowerShell and Linux specific commands.  I’ve been amazed at how much of my code ‘just works’.

Updating PowerShell

There’s no WMF on Linux, so upgrading PowerShell on Linux is a bit different.  As new releases are posted HERE, download the new .deb file.  You can run this manually, which will launch Ubuntu Software Center.

updating.png

Or you can always update a deb Debian Package from the command line too.

sudo dpkg -i ./newFile.deb

updating2

Where’s the PowerShell ISE?

There is NO ISE release…yet.

However you can use Visual Studio Code and its Integrated Console mode to get something that feels very similar.

Note: these steps will cause Terminal to automatically load PowerShell.  If you don’t want this to happen, don’t do them.

First, download Visual Studio Code here.

Code Install

Choose to install via Ubuntu Software Center

Code Install2

Next, launch Terminal and type sudo gedit ~/.bashrc this will launch your Bash Profile, which is pretty much where the idea for PowerShell profiles came from [citation needed].  We’re going to tell Bash to Launch PowerShell by default when it opens.

Now, go to the very bottom line of the file and add this content

echo "Launching PowerShell"

powershell

It should look like this when completed.

Setting PowerShell to launch

Save the file and reopen bash (the actual name of the Linux Terminal) to see if it worked.

Finally, launch Visual Studio Code by Clicking the Linux Start Button 😜 and typing ‘Code’

Code Install3

The last step is to click ‘View->Integrated Terminal’ and then you should feel right at home.

feels like the ISE
We’ve got Syntax Highlighting, cool themes and a functional PowerShell Console in the bottom, AWESOME!

As time goes on, we should have F5 and F8 support added to Visual Studio Code as well, to make it feel even more the ISE.  And this isn’t just a substitute for the ISE, but also a very capable and powerful code editor in it’s own right.

One more thing

Do you hate the Linux style autocomplete, where it displays multiple lines with possible suggestions?

t

If so, then run:

Set-psreadlineoption -editmode Windows

Let’s dig in and become Linux experts too!


WinRM and HTTPs – What happens when certs die

$
0
0

winrm-https

Follow-up!

See the follow-up post 👻The Case of the Spooky Certificate👻 for what happens during a renewal!


For one of my largest customers, a burning question has been keeping us all awake at night:

Where does the soul go when an SSL Certificate expires?

Er, I may be getting too caught up in this ghost hunting theme (I blame the Halloween decorations which have been appearing in stores since the second week of July!  Spooky!). Let me try again.

If we enable WinRM with HTTPS, what happens when the certificate expires?

Common knowledge states that WinRM will stop working when a certificate dies, but I wanted to prove beyond all doubt, so I decided to conduct a little experiment.

What’s a WinRM listener?

Before you can run commands on remote systems, including anything like PSexec and especially remote PowerShell sessions, you have to run the following command.

WinRM quickconfig (-transport:https)

This command starts the WinRM Service, sets it to autostart, creates a listener to accept requests on any IP address, and enables firewall exceptions for all of the common remote managment ports and protocols WinRM, WMI RPC, etc. For more info…

The last bit of that command, transport:https determines whether to allow traffic over regular WinRM ports, or to require SSL for extra security. By default, in a domain we have at a minimum Kerberos encryption for remoting–while non-domain computers will use ‘Negotiate’ level of security–but sometimes we need to ensure a minimum level of tried and true encryption, which https and ssl provides.

How WinRM uses certificates

For a complete guide to deploying certificates needed for WinRM Remoting with SSL, stop reading and immediately proceed to Carlos’ excellent guide on his blog, Dark Operator.

In our usage case, security requires we use HTTPs for WinRM Communications, so we were pretty curious to see what WinRM does to implement certs.

When you run winrm quickconfig -trasnport:https , your PC checks to see that you’ve got a valid cert, which issued by a source your computer trusts, which references the common name of your computer and is valid for Server Authentication.  Should all of these be true, a new listener will be created, which references in hard-code the thumbprint of the cert used.

When a new session connects, the listener looks at the thumbprint and pulls the cert related from the cert store and uses this to authenticate the connection.  This will work fine and dandy..but when a certificate expires…is WinRM smart enough to realized this and update the configuration of the listener?

Testing it out: making a four-hour cert

To put this to the test, we needed to take a PC from no WinRM HTTPS listener, give it a valid cert, and then watch and see what happens when it expires.

I already had valid PKI in my test environment, thanks to Carlos’ excellent guide I referenced earlier.  All I needed to do was take my current cert template, duplicate it, and set the expiry period down to a small enough duration.

First, I connected to my CA, opened up Certification Authority and choose to Manage my Certificates.

Next, I right-clicked my previous WinRMHttps template and duplicated it.  I gave it a new name and brought the validity period down to 4 hours, with renewal open at 3 hours.

01-making-a-4-hour-cert
Four hours was a short enough duration for even my limited attention span–Oh a squirrel!

Satisfied with my changed, I then exited Cert Management, and back in Certification Authority, I chose ‘New Template to Issue

02-issue-the-cert

I browsed through the list of valid cert templates and found the one I needed, and Next-Next-Finished my way through the wizard.

03-deploy-the-cert

Finally,I took a look at my candidate machine (named SCOM.FoxDeploy.com), and ran GPUpdate until the new cert appeared.

00-no-cert
F5-F5-F5-F5-F5-F5-F5-F5-F5-F5-F5-F5-F5-F5-F5-F5-F5
08-omg-cert-expires-soon
Armed with a new Four Hour Cert I was ready to rock

World’s shortest WinRM Listener

I took a quick peek to see if there was a Listener already created for HTTPs, and there wasn’t.

04-validate-no-listener

So I ran winrm quickconfig -transport:https and then checked again.05-winrm-https-exists

To validate which certificate is being used, you can compare the output of dir wsman:\localhost\Services' to what you see under MMC->Certificates->Local Computer->Personal, as seen below.06-validate-cert

And for the magic, if both computers trust the same CA, all you have to do is run the following to have a fully encrypted SSL tunnel between the two PCs.

Enter-PSSession -ComputerName RemotePC.FQDN.COM -UseSSL

07-connecting-over-ssl

Now, I had merely to play the waiting game…only three hours to go!

The Waiting Game Sucks

I walked away from the PC at this point and came back after dinner, diapers and begging my children to sleep.

threehourslater

I left the PSSesson open, and was surprised to see the following message appear when I tried to run a command

cert-expired
Starting a command on the remote server failed with the following error message: The Server Certificate on the destination computer has the following errors: The SSL Certificate is expired.

Here’s the full text of that error message.

Starting a command on the remote server failed with the following error message: The Server Certificate on the destination computer has the following errors:  The SSL Certificate is expired.

Once the cert expires, you can’t run ANY commands on the remote computer, until you reconnect without SSL.  Interestingly, you can’t even run Exit-Psession to return to your PC if this happens.  I had to kill PowerShell.exe and relaunch it to continue.

All attempts at future reconnections also fail with the same error.

cert-expired2

In short summary:

When the cert expires, WinRM doesn’t realize it and keeps presenting the old cert.

In other words :yo winRm gone be broke

But what about auto renewal?

One question that came up over and over is whether auto renewal would step around this problem.

It won’t. It  SHOULDN’T  When a new cert is requested, you’ll always end up with a new cert, with new validity periods and other data will change as well.  All of this means there will be a different hash, and thus a different thumbprint.

This means that the previous listener, which to our understanding is never updated should not continue to function.  However, some people have reported that it does, and thus I’m digging in even deeper with a more advanced test.

Our take-aways

Today, WinRM’s implementation of SSL presents problems, and in some way is incomplete.  Microsoft is aware of the issue, and it is being tracked publicly both in GitHub and UserVoice.

Show your support if you’re affected by this issue by voting for the topics:

We’re working on a scripted method to repair and replace bad certificates, which is mostly complete and available here.  GitHub – Certificate Management.ps1.

When this problem is resolved, I will update this post.

Edit: I’m performing additional research around cert autorenewal and will update you all with my findings!


WinRM HTTPs and the Case of Ghost Certificate

$
0
0

the-case-of-the-ghost-certificate

This post is a follow-up to my previous post, WinRM : What Happens when certificates die?

In the previous post, we found that in a WinRM & HTTPs deployment, if a certificate is allowed to expire WinRM will not notice a new certificate for the purposes of allowing connections using Enter-PsSession -UseSSL.

However, in the comments of that post, Sandeep of Hakabo.com mentioned that he’d actually observed WinRM continuing to work after a cert renewal takes place, even though Microsoft best practice / recommendations state that the end-user needs to script around updating the listener.  Check out his post on PowerShell Remoting over SSL for more on his findings.

Clearly, a test was in order.

Setting the stage

First, we needed a good way to test cert renewal.  According to this article from Microsoft, the average Windows workstation will attempt to look for new certs and renew eligible certs once every eight hours.

To accurately test for what happens when a cert renews, I needed to worry about either lining up a cert renewal to the automatic period, or find a way to trigger a renewal manually.

I found that you can use the certutil -pulse command to manually trigger a renewal attempt, which uses the same mechanism which the Windows Certificate Services Agent uses.

For this test, I modified my previous template and now set an eight hour lifespan, with a two hour renewal period.

10-new-test

To handle cert renewal and make sure one happened successfully, I wrote this PowerShell one-liner to sit and wait and then try to pulse for certs once an hour.

while ($true){
"$(get-date | select -expand DateTime) pulsing the cert store"|
    tee -append C:\temp\Winrm.log
start-sleep (60*60)
}

Now, I wanted a good way to capture certificate changes, so first I set about capturing the thumbprint of the currently valid cert, since this would be changing while my test ran.  Since I only had one cert, I simply grabbed the ThumbPrint value from the only cert issued to this machine.  I embedded this also within my log file output.

"--current valid thumbprint $(get-childitem Cert:\LocalMachine\My |
select -ExpandProperty ThumbPrint)"| tee -append C:\temp\Winrm.log

And finally, I also needed to see which cert thumbprint WinRM was presenting, or thought it was presenting.  These kinds of settings are stored within the wsman: PSDrive, under listener the HTTPS listener.  I parsed out this value (your listener name will be different, so remember to change this if you use this code).

</pre>
<pre>get-item WSMan:\localhost\Listener\Listener_1305953032\CertificateThumbprint |</pre>
<pre>   select -expand Value

Combing all of these diagnostics, I got this as the result, which echoes out to a file like this.

while ($true){
 "$(get-date | select -expand DateTime) pulsing the cert store"| tee -append C:\temp\Winrm.log ;
"--current valid thumbprint $(get-childitem Cert:\LocalMachine\My | ? Notafter -ne '9/8/2017 4:48:40 PM' | select -ExpandProperty ThumbPrint)"| tee -append C:\temp\Winrm.log ;
"--current WSman thumbprint $((get-item WSMan:\localhost\Listener\Listener_1305953032\CertificateThumbprint | select -expand Value) -replace ' ')" | tee -append C:\temp\Winrm.log ;
"---pausing for one hour"
start-sleep (60*60)
}

11-log

Finally, I launched a PsSession from a remote PC, and had that session also echoing out to a log file twice an hour.

while ($true){"currently connected at $(get-date | select -expand DateTime)">>c:\temp\winrm.log;
start-sleep (60*60)}

So the log file looks like this when both channels are dumping into the same file.

11-log-complete

What happened?

When I came back the next morning, my whole desk was covered in ectoplasm!!  Eww!  No, not really.  But I will still stunned!

The PSSessions were still open.  Even though the certificate renewed overnight!  I could validate this by checking the output in the log files.

This is kind of a complex graphic.  At the top, you’ll see a snippet from my Certificate Authority, showing that a new cert was issued at 6:56 PM.

On the left, you see the log file from that time, echoing out to the screen with no interruption.  Then, on the right, you’ll see the actual output from the console which was connected…no disruption.

14-logging-not-broken
If there were a disruption, we would see the above Warning text, stating that the connection was broken and will be retried for the next four minutes

So, that was all pretty interesting and conclusive proof that WinRM somehow is able to handle a cert renewing, and also not drop any current connections.

This is where things get weird

the clinging mist issuing forth from the derelict disk drive wrapped around the intrepid nerd’s fingertips, threatening to chill his hands and adversely impact his APM, causing a huge drop in his DKP for this raid

-Unknown author, from the Nerdinomicon

The reports we saw from Sandeep and one other person said that WinRM would either still list the old cert in the UI, or even still USE the old cert.  Previous tests showed that if an invalid cert is presented, WinRM will not work.  So now we took a look at the log file output.

12-cert-renewed

This was puzzling!  I can see that a new cert was issued based on the changed thumbprint, but if my log could be tested, it looked like WinRM was still referencing the old cert!

Now I opened the cert itself in the MMC and compared it to the results within the WSMan settings.

13-cert-doesnt-match

So, the cert renewed and the PSSession remained open, but WSMan still stubbornly reported that it was using the previous thumbprint!

But did you reboot it / restart WinRm/ etc?

Yes.  I tried everything, and no matter what, WinRM continued to reference the old certificate thumbprint.  However, WinRM SSL connections still worked, so clearly some mechanism was correctly finding the new Cert and using that!  The only way to get WinRM to reflect the new cert was to delete the old listener and recreate it, using winrm qc -transport:https all over again.

How is it even working?

I’m not sure, guys, but I did open an issue with Microsoft on the matter, here on Github.

WinRM Certificate Implementation is REALLY weird

Tests have been conducted from Server 2012 R2 machines running WMF 5.0 to other machines of the same configuration.  I’m conducting tests now with 2008 R2 machines ot see if we find the same behaviour.

Until next time…

iiam.gif


Part V – Introducing the FoxDeploy DSC Designer

$
0
0

IntroToDsc

This post is part of the Learning DSC Series here on FoxDeploy.com. To see the other articles, click the banner above!


For years now, people have been asking for a DSC GUI tool. Most prominently me, I’ve been asking for it for a longggg time!

My main problem with DSC today is that there is no tooling out there to help me easily click through creating my DSC Configurations, other than a text editor. For a while there, I was hoping that one of the tools like Chef or Puppet would provide the UX I wanted, to click my way through making a DSC Configuration for my machines…but after checking them out, I didn’t find anything to do what I wanted.

So I made my own.

imaage base layer designed Designed by Freepik

Release Version 1.0

Get it here on GitHub!  

Want to contribute?

I’ve made a lot of PowerShell modules before but none of my projects have ever been as ambitious as this.  I welcome help!  If you want to rewrite it all in C#, go for it.  If you see something silly or slow that I did, fix it.  Send me Pull Requests and I’ll merge them.  Register issues if you find something doesn’t work.

I want help with this!

Where will we go from here

This project has been a work-in-progress since the MVP Summit last year, when I tried to get MS to make this UI, and they told me to do it on my own!  So this is version 1.0.  Here’s the planned features for somewhere down the road.

Version Feature Completed
1.0 Released! ✔️
1.1 Ability to enact the configuration on your machine
1.2 Button to jump to local dsc resource folder
2.0 Display DSC Configuration as a form
2.? render absent/present as radio button
? render multi-choice as a combobox
? render other options as checkbox
? render string as a textbox
? Display DSC Configuration as a form
?? Track configuration Drift?

How was this made?

I thought you’d never ask.  Check out this link here to see how this app was made.


Part VI – In-Depth Building the FoxDeploy DSC Designer

$
0
0

series_PowerShellGUI

This post is part of the Learning GUI Toolmaking Series, here on FoxDeploy. Click the banner to return to the series jump page!


Where we left off

Thanks for joining us again!  Previously in this series, we learned all about writing fully-fledged applications, in Posts 1, 2 and 3. Then, we learned some techniques to keeping our apps responsive in Post 4.

In this post, I’ll walk you through my GUI design process, and share how that actually worked as I sought to create my newest tool.

Along the way, I’ll call out a few really confusing bugs that I worked through in creating this tool, and explain what went wrong. In particular, I ran into quite a snag when trying to programmatically create event handlers in code when trying to use $psitem  or $_. This lead to many conversations which introduced me to a powerful solution: the $this variable.

What is the tool?

Introducing the FoxDeploy DSC Designerlink to the DSC Designer Post.

imaage base layer designed Designed by Freepik
Think something sort of like the Group Policy Management Console, for your DSC Configurations. But we’ll get back to this in a few minutes.

My GUI Design Process

Here’s my general process for designing a front-end:

  • Create the elevator pitch (Why does this need to exist?)
  • Draw out a rough design
  • Make it work in code
  • Add feature by feature to the front end
  • Release
  • Iterate

It all started with me taking a trip to Microsoft last year for the MVP Summit.  I’d been kicking around my elevator pitch idea for a while now, and was waiting to spring it on an unwary Microsoft Employee, hoping to con them into making it for me:

Here’s my elevator pitch

To drive adoption of DSC, we need some tooling. First, we need a GUI which lists all the DSC resources on a machine and provides a Group Policy Management Console like experience for making DSC configs.

We want to make DSC easier to work with, so its not all native text.

I decided to spring this on Hemanth Manawar of the PowerShell team, since I had him captive in a room.  He listened, looked at my sketches, and then said basically this:

‘You’re right, someone should make this…why not you?’

Thanks guys.  thanks

So I got started doing it on my own.  With step one of the design process –elevator pitch– out of the way, I moved on to the next phase.

Time to draw a Rough Draft of the UX

This is the actual sketch I drew on my Surface to show Hemant while in Redmond for the 2015 MVP Summit. It felt so right, drawing on my Windows 10 tablet in OneNote, with guys from Microsoft…it was just a cool moment of Kool-Aid Drinking.  In that moment, my very blood was blue, if not my badge.

RoughDraft
‘oh, now I know why you didn’t pursue a career in art’

What will be immediately apparent is that I lack both handwriting and drawing skills…but this is at least a start. Here’s the second design document, where I tried to explain how the user will actually use it.

RoughDraft2

Stepping through the design, a list of all DSC resources on the left.  Clicking a Resource name adds a new tab to the ‘config design’ section of the app, in which a user would have radio buttons for Present/Absent, Comboboxes for multiple choice, and textboxes for text input.  On the bottom, the current ‘sum’ of all tabs would be displayed, a working DSC configuration.

Finally, an Export button to generate a .mof or Apply to apply the DSC resource locally.  We marked the Apply button as a v 2.0 feature, wanting to get some working code out the door for community feedback.

With the elevator pitch and rough draft drawing completed, it was now time to actually begin coding.

Making it work in code

The code part of this is simple. Running Get-DSCResource returns a list of all the resources. If I grabbed just the name property, I’d have a list of the names of all resources. If I made one checkbox for each, I’d be set.

DSC01

Now, to pipe this output over to Get-DSCResource -Syntax, which gives me the fields for each setting available in the Resource.

DSC02

I started with a brand new WPF application in Visual Studio,  there were a lot of different panel options to choose with WPF, here’s a super helpful site explaining them. I used a combination of them.

Living on the Grid

I started with a grid layout because I knew I wanted my app to be able to scale as the user resized it, and I knew I needed two columns, one for my DSC Resource Names, and the other for the big Tab control.

You do this by adding in a Grid definition for either rows, columns or both. Then when you add containers inside of the grid, simply specify which Grid area you want them to appear within.

<code><Grid.ColumnDefinitions>
<ColumnDefinition Width="1*" />
<ColumnDefinition Width="2*" />
</Grid.ColumnDefinitions>


Since I want my DSC Resources to appear on the left side, I’ll add a GroupBox with the header of ‘Resources’ and a button on the left side. In the GroupBox, I simply add Grid.Column="0" to bind this container to the that Column.

<GroupBox x:Name="groupBox" Header="Resources" HorizontalAlignment="Left" VerticalAlignment="Top"  Margin="0,0,0,5">
<DockPanel x:Name="Resources" HorizontalAlignment="Left" Margin="0,0,0,0" VerticalAlignment="Top" Grid.Column="0">
<Button Content="Remove All" Width="137" />
</DockPanel>
</GroupBox>

And the code to lock my Tab to the right column

<TabControl x:Name="tabControl" Grid.Column="1" >
<TabItem Header="TabItem">
<Grid Background="#FFE5E5E5"/>
</TabItem>

All of this footwork result in this UI.

initial grid

Next, I needed a way to create new checkboxes when my UI loads. I wanted it to run Get-DSCResource and grab the name of all the resources on my machine. I came up with this structure


$resources = Get-DscResource

ForEach ($resource in $resources){
   $newCheckBox = New-Object System.Windows.Controls.CheckBox
   $newCheckBox.Name = $resource.Name
   $newCheckBox.Content = $resource.Name
   $newCheckBox.Background = "White"
   $newCheckBox.Width = '137'
   $newCheckBox.Add_click({
      $TabName = $resource.Name
      $tab = New-Object System.Windows.Controls.TabItem
      $tab.Name = "$($TabName)Tab"
      $tab.Header = $TabName
     $WPFtabControl.AddChild($tab)
   })
[void]$WPFResources.Children.Add($newCheckBox)

}

This seemed to work just fine, and gave me this nice looking UI.

grid01

However, when I clicked the checkbox on the side, instead of getting tabs for each resource, I instead…well, just look!

grid02

Only the very last item added to the list was getting added. That seemed like quite a clue…

Here there be dragons

So I ran into a HELL of a snag at this point. I spent literally a week on this problem, before scripting superstar and general cool-guy Dave Wyatt came to save my ass.

Why was this happening? To quote Dave:

 The problem is that when your handler is evaluated, $resource no longer refers to the same object that it did inside the loop. You should be able to refer to $this.Name instead of $resource.Name to fix the problem, if I remember correctly.

What’s $this?

$This
In a script block that defines a script property or script method, the
$This variable refers to the object that is being extended.

I’d never encountered this before but it was precisely the tool for the job. I simply swapped out the code like so:

$TabName = $this.Name

And the issue was resolved. Now when I clicked a checkbox, it drew a new tab containing the name of the resource.

grid03

Loading the resource settings into the tab

When we run Get-DSCResource -Syntax, PowerShell gives us the available settings for that resource. To get this going as a POC, I decided it would be OK if the first release simply presented the information in text form to the user.

So, I added a text box to fill up the whole of the tab. First, when the box is checked, we create a new TabItem, calling it $tab  and then we set some properties for it.

Next, because I want to make a TextBox fill up this whole $tab, we make a new TextBox and define some properties for it as well, including, notably:

    $text.Text = ((Get-DscResource $this.Name -Syntax).Split("`n") -join "`n")

…which will grab the syntax for the command, and remove unnecessary WhiteSpace.

Finally, we set this $text as the Content value for the TabItem, and add the TabItem to our parent container, $WPFTabControl.


    $newCheckBox.Add_checked({
                    $WPFStatusText.Text = 'Loading resource...'
                    $TabName = $this.Name
                    $tab = New-Object System.Windows.Controls.TabItem
                    $tab.Name = "$($TabName)Tab"
                    $tab.Header = $TabName

                    $text = New-Object System.Windows.Controls.TextBox
                    $text.AcceptsReturn = $true
                    $text.Text = ((Get-DscResource $this.Name -Syntax).Split("`n") -join "`n")
                    $text.FontFamily = 'Consolas'
                    $tab.Content =  $text

                    $WPFtabControl.AddChild($tab)
                    $WPFStatusText.Text = 'Ready...'
                    })

Here’s the resultant GUI at this point:

grid04

Now, to add the rest of our GUI.

Adding final UI touches

Any DSC Configuration should have a name, so I wanted to add a new row to contain a label, a TextBox for the Configuration Name, a button to Export the Config, and finally a button to clear everything. I also knew I would need another row to contain my big compiled DSC configuration too, so I added another row for that.

<Grid.RowDefinitions>
<RowDefinition Height="5*" MinHeight="150" />
<RowDefinition Name="GridSplitterRow" Height="Auto"/>
<RowDefinition Height="2*" MaxHeight="30" MinHeight="30"/>
<RowDefinition Name="GridSplitterRow2" Height="Auto"/>
<RowDefinition Height ="Auto" MaxHeight="80"/>
<RowDefinition Name="GridSplitterRow3" Height="Auto"/>
<RowDefinition Height ="Auto" MaxHeight="30"/>
</Grid.RowDefinitions>

I also wanted my user to be able to resize the UI using sliders, so I added some GridSplitters as well. Below you’ll see the GridSplitters on either side of another dock panel, which is set to appear below the rest of the UI, based on the Grid.Row property.

<GridSplitter Grid.Row="2" Height="5">
<GridSplitter.Background>
<SolidColorBrush Color="{DynamicResource {x:Static SystemColors.HighlightColorKey}}"/>
</GridSplitter.Background>
</GridSplitter>
<DockPanel Grid.ColumnSpan="2" Grid.Row="2">
<Label Content="Configuration name"/>
<TextBox Name="ConfName" Text="SampleConfig" VerticalContentAlignment="Center" Width='180'/>
<Button Name="Export" Content="Export Config"/>
<Button Name="Clearv2" Content="Clear All"/>
</DockPanel> 

These elements render up like so:

row-2

Finally, to add the resultant textbox. The only thing out of the ordinary here is that I knew our DSC Configuration would be long, and didn’t want the UI to resize when the configuration loaded, so I added a ScrollViewer, which is just a wrapper class to add scrollbars.

<DockPanel Grid.ColumnSpan="2" Grid.Row="3">
<ScrollViewer Height="239" VerticalScrollBarVisibility="Auto">
<TextBox x:Name="DSCBox" AcceptsReturn="True" TextWrapping="Wrap" Text="Compiled Resource will appear here"/>
</ScrollViewer>
</DockPanel>

We also added a status bar to the very bottom, and with these changes in place, here is our current UI.

complete-ui

Compiling all tabs into one DSC Config

When a user makes changes to their DSC tabs, I want the Resultant Set of Configuration (RSOC!) to appear below in the textbox. This ended up being very simple, we only need to modify the code that creates the Textbox, and register another event listener for it, like so:

$text.Add_TextChanged({
$WPFDSCBox.Text = @"
configuration $($WpfconfName.Text) {
$($WPFtabControl.Items.Content.Text)
}
"@

This single change means that whenever the textChanged event fires off for any textbox, the event handler will trigger and recompile the .Text property of all tabs. Nifty!

gif

Wiring up the Clear and Export Buttons

The final step is to allow the user to reset the UI to starting condition, by adding a event listener to my Clear Button.

$WPFClearv2.Add_Click({
$WPFResources.Children | ? Name -ne Clear | % {$_.IsChecked = $False}
$WPFDSCBox.Text= "Compiled Resource will appear here"
})

And finally add some code to the export button, so that it makes a .mof file.  Here I used the System.windows.Forms.FolderBrowserDialog class to display a folder picker, and I access the value the user chooses, which persists once the picker is closed as .SelectedPath.

$FolderDialog = New-Object System.Windows.Forms.FolderBrowserDialog
$FolderDialog.ShowDialog() | Out-Null
$outDir = $FolderDialog.SelectedPath

This results in this nice UI experience.

Last of all, I wanted a way to display a prompt to the user that the file was exported correctly.

What’s next?

This is what I’ve been able to complete so far, and it WORKS! If you’d like to, feel free to pitch in and help me out, the project is available here.

github-bb449e0ffbacbcb7f9c703db85b1cf0b

Here are my short-term design goals for the project from here on:

  • Develop new UX to change from text driven to forms based UI with buttons, forms, comboboxes and radios
  • Add support for multiple settings within one configuration type (currently you have to copy and paste, if you want to add multiple File configurations, for instance.
  • Speed up execution by heavily leveraging runspaces (and do a better job of it too!)

Microsoft Ignite 2016 : Recap

$
0
0

Last week, I was able to attend my first big IT Conference, a dream of mine since I first got into IT almost ten years ago.  I got to attend Microsoft Ignite!

IT WAS AWESOME!

In this post, I’ll recap some of my experiences attending…and being able to speak there as well!

On the value of Ignite

Ignite is Microsoft’s gigantic combination of TechEd and MMS, a far-reaching summit covering all of Microsoft’s technology stack, from devices to SQL, asp.net to Azure, everything is here.

It is HUGE. Just overwhelmingly big. You simply cannot attend every session, and you’ll probably find yourself triple or quadruple booked for sessions.  Keep in mind that conferences like Ignite commonly take place in massive convention centers like the Georgia World Congress Center.  Actually, while I’m talking about it:

The GWCC

The Georgia World Congress Center is absolutely unfathomably big.  It is the fourth biggest convention center in the United States.  If you’re in Hall A, the walk to Hall C will easily take you twenty minutes or more.  And the session might be full by the time that you get there.

Enter the Ignite app.  One AWESOME feature of this app is the ability to livestream any session live from your app.  Very convenient.  I used this a lot, as my feet got progressively more sore and I became lazier and lazier.  There is also an area full of comfortable couches, bean bags, tables and chairs called the ‘Hangout’.  In this area, you can chat and have snacks and watch sessions on a colossal, wall filling screens.

2016-09-29-16-27-36
the hangout, great when you’re feeling lazy or want to socialize

I spent a lot of time here!

The Expo Hall

Ignite features an absolutely amazing and gigantic vendor hall.  Something like…a lot of Vendors were here.

Actually, for a Windows / Microsoft guy, the Expo hall is amazing.  I instantly recognized the vast majority of vendor names and had good conversations with the vendors, or learned of cool new features, like the v3.0 release of SquaredUp, which now works on the HoloLens!

capture_2016-09-27-12-00-02
Tried on the Hololens! Verdict : definitely try one on!

I also got to try on the HTC Vive, which blew my socks off.  As one of the 10% of people who experience SIM Sickness, which makes me very ill if I have a bad VR session, I was afraid that I’d never be able to play VR at all.

However, those fears were all alleviated when I put on the Vive.  Fully immersive, head and motion tracking VR meant that I could move around as I wanted and my inner ear accepted the experience as reality.  AWESOME!  I learned that room scale VR is a must for me.

Roughly half of the floor space of the expo hall was reserved for Microsoft, who filled the space with dozens of booths which had high-tech displays and whiteboards to help diagram solutions.  If you need help with a Microsoft expert for ANY issue, you can find that answer here on the Expo Hall floor.

For organizations with pressing IT challenges who want to get a lot of highly qualified answers, the expo hall alone is worth the price of admission to Ignite.

But people don’t go to the hall for the swag or vendors..they go for the AMAZING SESSIONS!

My favorite sessions

There were SO many incredibly good sessions at Ignite.  I made this YouTube playlist (seems Ignite is more hosted on YouTube this year rather than on Channel 9).

To draw attention to my favorites of these

System Center 2016 – What’s new : a great one hour session cataloging all of the nice new features of mostly SCOM, which I need for my customers

Monitor your Datacenter with SCOM : again, I need to stay on top of changes in SCOM.  I love all the new changes.

Notes from the field, how real people deployed nano server: I love to hear how things actually break in the wild!

PowerShell Unplugged – Jeffrey Snover and Don Jones : the two best PowerShell speakers of all time, delivering a GREAT session commemorating the ten year anniversary of PowerShell

On speaking

The first time I taught a class of PowerShell, I spent a month working on my course and practicing for it. I found out in September of that year that I’d be doing this training in three months.

I pretty much have no memory of those months, other than laying down in bed with my heart pounding. I lost so much sleep and felt queasy all the time, so I actually lost weight!

Just attending a conference like Ignite had always been a dream of mine, to meet those people who helped me so much, and thank them or get my questions answered. It never even occurred to me that I might one day be giving  a talk at Ignite, and I definitely never expected to have more than a few people sign up for it.

I was humbled greatly to see the numbers of people sign up and knew I had to focus and do my best. I spent hours and hours listening to great public speakers like Simon Peeriman, Don Jones and Jason Helmick, and listened over and over to James Whitaker.

I practiced my full session with demoes more than ten times all the way through, working on whittling the content down and practicing my transitions.

I used that fear to motivate me, and on the day of the talk, woke up full of energy and no worries.

wp-image-474691417jpg.jpg

The crowd packed in! But for my first session I had no mic so I had to yell! Very, very tough.

People cramming in to try and hear me yell over the very, very loud Neugenic booth behind me.
People cramming in to try and hear me yell over the very, very loud Nutanic booth behind me.

For my second session of the day, I had a mic! Life was much better.

On being recorded

One of my dreams was to have my session from Ignite be recorded, kind of like proof of having been there. I never expected to be recorded in a studio though! Seeing the massive Ignite studio, which took up a huge section of Hall C, in the Hangout section, I immediately felt my heart start pounding again.

My thoughts ” boy I hope no one comes!”

The morning of, I met the awesome Jeremy Chapman, who makes the wonderful Microsoft Mechanics videos. Then I got miced up and ready. I was hoping that, with this being the last day of Ignite, crowds wouldn’t be too big.

NOPE.

All in all, I feel good about how my session went.  I think I’d even like to speak at more conferences!  Once the nerves died down, I found speaking to be very, very exciting and rewarding.  I know that at the end of the day, I did my absolute best to make this the highest quality twenty minute introduction to PowerShell that I could make it.

Here’s my session, if you’d like to watch it!


Use PowerShell to download video Streams

$
0
0

DownloadingVideoStreams

We live in an amazing world of on-demand video and always available bandwidth, where people can count on full reception at all times on their device.   If you want to watch cool videos from events or conferences, you can just load them on when you’re on the road with no issues, right?

Yeah right.

Streaming is cool and all, but there are times when it’s nice to have videos saved locally, like the huge backlog of content from MMS and TechEd.  However, a lot of streaming services want you to only view their videos within the confines of their web page, normally with a sign-in session.

In this post, I’ll show you a few ways to download videos you’ll run across online, and how you can use PowerShell to download some of the REALLY tricky ones.

How to do this on most platforms

If I need to save a video from YouTube or other sites like it, I go to KeepVid, first and foremost.

Google isn’t a fan of this site as they want you loading up YouTube and watching ads whenever you watch a video, so they try to dissuade you from entering the site. They do this by displaying this scary warning page if you browse to the site from a google search, but the site can be trusted, in my experience.

Scary
This message is FUD! it’s safe to use!

This is an easy to use website which uses Javascript to parse out the streaming behavior of a video and then presents you with a link to download your video in many different resolutions.

Options

This works for about 60% percent of sites on the web, but some use different streaming JavaScript platforms which try to obfuscate the video files.

How to manually save a video file using Chrome

If KeepVid doesn’t work, there is a way to do what it does manually.

I’ve been into Overwatch recently, and have been watching people play on Streamable.  Sometimes you see a really cool video and you want to save it,  like this one of this beast wiping out pretty much everyone in eight seconds.

Let’s fire up Chrome and hit F12 for the developer tools.  Click on the Network tab.

00

This will show us a waterfall view of elements on the page as they’re downloaded and being used.  We can even right click individual items to open them in a new tab.

Now, browse to the site with the video in question and click Play (if needed).  You need to trigger the video to begin playing for this to work.  Watch as all of the elements appear and look at the one with the longest line.  If it’s one giant long line, you’ve found a .mp4 or .ts file somewhere, which is the video was want to keep.

GIF

In this gif, my mouse wouldn’t appear but I let the site load, hit Play, and then click on the longest line in the timeline view on top. I then right click the item with the type ‘Media’ and here you can grab the file URL or open a new tab to this URL.  Do that and then you can save the video file.

This technique works for a LOT of the streaming videos on the Web and is especially good when your video won’t download using keepvid.

However, some sites use insidious methods to make it nearly impossible to save files. For them…

How to deal with the REALLY tricky ones

I have been all about learning Chef recently.  I see it as the evolution of what I do for a living, and I think in two or three years, I’ll be spending a lot of time in its kitchen.  So I’ve been consuming learning materials like a fiend.  I found this great video on demand session by Steven Murawski.

preview_1460658919

And I signed up for the presentation.  I watched the talk but was sad to see no link to download the video (which I would need, with no reception later that day). So I used the same Developer Tools trick I showed below and hopped into the tab, only to see this.

01

See how there are many different video files with an ascending number structure?  This site uses the JW player, similar to the platform used by Vimeo.  This is a clever streaming application, because it breaks apart files into 10 second snippets which it stitches together at playback.

Rather than one file to download, there are actually hundreds of them, so we’ll need to find an easy way to download them all.  I used the chrome developer trick to download one chunk and popped one of these mp2 files in VLC, and found that each snip was ~ 10 seconds long, and the video was an hour, so I’d need to download roughly 360 files.

Obviously I wasn’t about to do this by hand.

Figuring out the naming convention

If we look at the file URL, we see the video files seem to have this format:

02

If we could use some scripting tool to reproduce this naming convention, we could write a short script to keep downloading the chunks until we get an error.

Recreating the unique URLs isn’t too hard. We know that every file will begin with

video_1464285826-2_

then a five digit number, followed by

.ts

. We can test the first five chunks of the file with a simple

1..5

Put them all together to get:

foreach($i in 1..5) {"video_1464285826-2_$i.ts"}

Finally, to put the number in the right format, we just need to use $i.ToString(“00000”), which will render a 1 as 00001, for instance. Now to test in the console

download

Downloading the files

We can use PowerShell’s Invoke-WebRequest cmdlet to download a file.  Simply hand it the -URI you want to download, and specify an output path.

To use this, pick the destination for the file for line 1, and then for line 2, replace this with the baseURL of your video file.(If the file is http://www.foxdeploy.com/videos/demo1.mp4, then the baseurl would be http://www.foxdeploy.com/videos/).

$outdir = "c:\temp\VOD"
$baseUrl = "http://someserver.com/asset/video/"
cd $outdir
$i = 50
do {
 $url = "$baseUrl/video_1464285826-2_$($i.ToString("00000")).ts"
 Write-Host "downloading file $($i.ToString("00000"))..." -nonewline
 try { Invoke-WebRequest $url -OutFile "$outdir\$($i.ToString("00000")).ts" -PassThru -ErrorAction Stop | Tee-Object -Variable request | Out-Null}
 catch{
 write-warning 'File not found or other error'

 break
 }
 write-host "[OK]"
 Start-Sleep -Seconds 2
 $i++
 }
until ($request.StatusCode -ne 200)

After dropping in the right base URL and specifying your file naming convention, hit F5 and you should see the following.

GIF1

Joining the files back together

At this point we’ve got loads of files, but we need to combine or concatenate them.

This is possible through VLC, but Video LAN client will create timestamp errors (fast forward won’t work) if you use it. It’s better to re encode them.

To join the files, you’ll need FFMpeg.  Install it then run it from the start menu (which adds FFMpeg to your Path Environmental Variable, we need this later!).

Important! Open a new PowerShell prompt and try to launch ffmpeg

If it doesn’t work, copy ffmpeg into your C:\windows\system32 folder.

Assuming you need to merge a bunch of video files into one, just browse to the directory where you saved your files, and then run the following code.  Replace line 2 with the path to the source files (and the right extension), then on line 4, replace with the desired file name.

#replace with the location containing files to merge
$source = c:\temp\videos\*.ts

#destination file
$output = "$home\Video\output1.ts"

#this looks weird, but FFMpeg must have files in a pipe seperated list, very weird working with PowerSherll!
$files = (Get-ChildItem $outdir | select -expand Name ) -join '|'

#execute
ffmpeg -i "concat:$files" -c copy $output

Accepting Challenges

Have another bulk file download/management task you need to tackle with PowerShell?  Leave me a message and I’ll help you figure it out.


Class is in Session: PowerShell Classes

$
0
0

ClassesInPowerShellGraphic

PowerShell has been mostly complete for you and me, the ops guys, for a while now. But for Developers, important features were missing.

One of those features were Classes, a important development concept which probably feels a bit foreign to a lot of my readers. For me, I’d been struggling with classes for a long time. Ever since Middle School. #DadJokeLol.

In this post, I’ll cover my own journey from WhatIsGoingOnDog to ‘Huh, I might have something that resembles a clue now’.

I’ll cover what Classes are, why you might want to use them, and finally show a real-world example.

What the heck are Classes?

If you’ve been scripting for a while, you’re probably very accustomed to making CustomObjects. For instance, I make Objects ALL the file that contain a subset of properties from a file. I’ll commonly select a File’s Name, convert it’s size into KB, and then display the LastWriteTime in days.

Why, because I want to, that’s why! It normally looks like this.


#code go here!

$file = Get-Item R:\Dan_Hibiki.jpg

##Using Calculated Properties
$file | Select-Object Name, @{Label='Size(KB)';Expression={[int]($_.Length / 1kb)}},`
@{Label='Age';Expression={[int]((get-date)-($_.LastWriteTime)).Days}}

##Instantiating a custom object
[pscustomobject]@{Name=$file.Name
'Size(KB)'=[int]($file.Length / 1kb)
'Age'=[int]((get-date)-($file.LastWriteTime)).Days
}

Name Size(KB) Age
---- -------- ---
Dan_Hibiki.jpg 38 1053

This is fine for one off usage in your code, but when you’re building something bigger than a one-liner, bigger even than a function, you can end up having a lot of your code consumed with repetition.

The bad thing about having a lot of repetition in your code is that you don’t just have one spot to make a change…instead, you can end up making the same change over, and over again! This makes it REALLY time-consuming when you realize that you missed a property, or need to add an extra column to your output. A minor tweak to output generates a lot of work effort in cleaning things up.

What problems do they solve?

From an operations / scripting perspective: Classes let us save a template for a custom object. They have other capabilities, true, but for our needs, understanding this use case will make things much easier.

Most of your day to day scripts will not need Classes. In fact, only very complex and advanced modules really make sense as a use cases for Classes. But it’s a good idea to know how to use them, so you’ll be prepared when the opportunity arises.

Where can I use Classes?

Keep this in mind, PowerShell Classes are a v5.0 Feature. If you’re writing scripts that target machines running Server 2003 or Vista, you’ll not be able to use Classes with this syntax we’ll cover here.

What If I need classes on an older machine?

If you REALLY need classes on WMF 4 or earlier machines, you can access them using Add-Type. For an example, check out the answers here on this post from StackOverflow.

Surprise! You’ve been using Classes all along! Kind of.

It’s easy to get started with classes. In fact, you’re probably used to working with them in PowerShell. For instance, if you’ve ever rounded a number in PowerShell, you’ve used the [Math] class, which has many helpful operations available.


$pi = 3.14159
[Math]::Round($pi,2)
3.14

[Math]::Abs(-1234)
1234

Wondering about the double colon there? No, I’m not referring to the delicious chocolatey stuffed Colon candy, either.

chocolate-stuffed-colon
Remember kids to get this checked out regularly once you’re in your thirties.

What we’re doing there is calling a Static Method.

Methods: Instance versus Static Methods

Normally when we call methods, we’re used to doing something like this.


$date = Get-Date
$date.AddDays(7)

In this process, we’re calling Get-Date, which instantiates (which makes an instance of) an object of the DateTime class.

As soon as we go from the high level description of the class to an actual object of that class (also called an instance), it get’s its own properties and methods, which pertain to this instance of the class. For this reason, the methods we get from instantiating an instance of a class is referred to as Instance Methods.

Conversely, when a class is loaded into memory, its methods are always available, and they also cannot be changed without reloading the class. They’re immutable, or static, and you don’t need to call an instance of the class to get them. They’re known as Static Methods.

For example, if I want to round a number I just run


[Math]::Round(3.14141,2)
>3.14

I don’t have to make an instance of it first, like this.

#What we won't do
$math = new-object -TypeName System.Math

>new-object : A constructor was not found. Cannot find an appropriate constructor for type System.Math.

This error message of ‘No constructor is telling us that we are not meant to try an make an object out of it. We’re doing it wrong!

Making a FoxFile class

Defining a class is easy! It involves using a new keyword, like Function or Resource. In this case, the keyword is Class. We then splat down some squiggles and we’re done.


Class FoxFile

{

#Values you want it to have (you could allow arrays, int, etc)
[string]$Name
[string]$Size
[string]$Age

#EndOfClass
}

Breaking this down, at the start, we call the keyword of Class to prime PowerShell on how to interpret the following script block. Next, I define the values I want my object to have.

If I run this as it is…I don’t get much out of it.

PS > [FoxFile]

IsPublic IsSerial Name BaseType
-------- -------- ---- --------
True False FoxFile System.Object

However, using Tab Expansion, I see that I have a StaticMethod of New() available. For free! If I run it, I get a new FoxFile object, but it doesn’t have anything defined.

PS > [FoxFile]::new()

Name Size Age
---- ---- ---

Not super useful…however because I didn’t add any instructions or bindings to it. Let’s go a little bit deeper.

Getting Fancy, adding a method to my Class

Adding a method is pretty easy. It can be thought of as defining a mini-function within our Class, and it basically looks exactly like a mini-cmdlet. A cmdletlett. Com-omelete. Mmm…omelet.

Going back to our class definition before, all we do is add a few lines of space and add the following:

FoxFile ($file)

{$this.Name = $file.Name
$this.size = $file.Length /1kb
$this.Age = [int]((get-date)-($file.LastWriteTime)).Days
}
$This weird variable

When we’re working with classes, we’re dealing with the special snow-flake vegetable, $this. In the above, we’re defining what happens when someone calls the new method.

We’ve already defined the properties we want this class to have, so we’re setting them here. We provide for one parameter which we’ll call $file, and then we map the Name property to what’s parsed in.
We do the same for .Size and .Age as well.
Now, let’s reload into memory…

Class FoxFile

{

[string]$Name
[string]$Size
[string]$Age

#define our constructor (our ::New method)
FoxFile ($file)

{$this.Name = $file.Name
$this.size = $file.Length /1kb
$this.Age = [int]((get-date)-($file.LastWriteTime)).Days
}

}

And let’s see what happens when I run this on a file.


$a = Get-Item .\Something.ps1xml

PS C:\Users\Stephen> [FoxFile]::new($a)

Name Size Age
---- ---- ---
Something.ps1xml 1.09 121

Yay it worked!!! But I feel like the elements of this are in my head, however, they’re not quite crystalized yet…

Let’s add a Crystal method!

Crystal ()

{start https://youtu.be/hfUSyoJcbxU?t=45}

Finally, to test it out, run the following.

$a = [FoxFile]::((Get-item .\Somefile.tla))
$a.Crystal()

And that’s pretty much it.  You can get very deep with Classes, for instance, I wrote an example, available here, of a VirtualMachine class you could use in Hyper-V, which is capable of creating a new VM.  In a lot of use cases, I might instead just write a module with a few PowerShell functions to handle the tasks of many methods for a class, but it’s always good to know how to use the tools in your toolbag.

Resources

One of the greatest things about PowerShell is the incredible community and repository of resources available to us.

Want a deeper dive than this? Checkout some of these resources here:

I was greatly helped by Ed Wilson’s awesome blog series on the topic here.

Additionally, Trevor made a good video series on classes here!

Finally, the wonderful writing of $Somedude here really helped me as well.


3 Hands-off deployments

$
0
0


handsoff

Let’s face it, guys.  There are times that you JUST don’t have access to SCCM, MDT or Kace, and need to deploy a completely automated and silent Windows install without our normal build tools.  If this is you, and you deploy systems frequently, you’ve probably spent way too much time looking at screens like this one

wicd-1

Not only does it stink to have to type a user name and password every time, it also slows you down. Admit it, whenever you start a Windows install, you start doing something else, and then an hour later check back and have to reload the whole task in your memory again.  It’s a giant waste of time and makes you less productive.

To top it off, there are probably things you always do, like setup user accounts, join a machine to a domain, and set the time zones (we can’t all live in the chosen timezone of Pacific Standard Time).

Previously, making these changes and baking them in to an unattended install meant using the terrible Windows SIM tool, which was horrible.  Seriously, no offense meant, but if you had a hand in designing the System Image Manager tool, I’m sure you’re already ashamed.  Good, you should be.

Thankfully we now have the Windows Image Configuration Designer (Wicd) which makes this all super easy!

In this post, we’ll walk you through everything you need to do to make a fully silent, unattended Windows Install, along with some useful settings too.  We will be installing WICD, which is part of the ADK, and then walk through configuring the following settings:

  • ‘Enable Remote Desktop out of the box’

  • Set Default Time zone (no west coast time!)

  • Set Default First User

  • Silent Install (depends on setting a user account)

  • Make the computer do a quick virus scan on first boot

  • Optional – Domain Join

  • Optional – Add files to the image

  • Optional – Make Registry Changes on the Image

Setting up WICD

To get access to the awesome WICD tool, you’ll need to have the Windows 10 ADK.  I recommend using version 1607, at a minimum (Download Link).  When installing the ADK make sure to check the two red boxes shown below, for full features.

wicd-2
If you leave these unchecked, it won’t be WICD good.  Make sure to ☑️

If you’re installing the ADK as a prerequisite for SCCM, be sure to check all four boxes shown above, at a minimum.

Next, download you’ll need a copy of your Windows ISO, mount or unzip it.  We’ll be looking for this file very soon, E:\Sources\install.wim.  Later on, we’ll need to reference additional files from it too, so keep it mounted there till the very end!

Now, open WICD and click ‘Windows image customization’

wicd-3
Don’t see this option?  You missed a step earlier!  Rerun the ADK install and be sure to check all the boxes listed above!!

Click through the next few pages, specifying a project folder and then selecting ‘Windows Image File’.

wicd-4
50% of my playtime in The Witcher is just trying on outfits.  It’s like Fashion Souls all over again…


WICD supports working with Windows Flashable Image files as well, the FPU file format.  This is the only option for Win10Iot, but not relevant to what we’re doing here, so select the top option (WIM File)

wicd-5

On the next page, browse to your source ISO, which we mounted earlier.  You’re looking for the install.wim file, which will be found at E:\Sources\install.wim.

wicd-6

In the next page, we can import a ProvisioningPackage.ppkg if we have one available.  Import it, if you’d like, or continue on if you don’t have one available.  Now we should be in this screen. Let’s work through the settings, one by one.

Enable Remote Desktop out of the box

Since I’m going to be deploying this image to my VMs, I want to natively be able to use the Enhanced Virtual Machine Connection feature available on Hyper-V Gen 2.0 VMs running a Windows 8.1 or higher.  The only dependency is that the ‘Remote Desktop Service’ must be enabled, so let’s go ahead and enable that.

In the left side of the screen, scroll down to Image Time Settings \ Firewall \ Firewall Groups

wicd-7

We’re going to create a new Firewall Group, titled Remote_desktop.  Type this in as the ID up top and click Add.  This will add a new node to our configuration on the left hand side of the screen.

wicd-8

wicd-9

Clicking on the left side of the screen shows our available customizations.  wicd-10

Select our group and choose ‘Active = True’, ‘Profile = All’ .  Now for one more setting, scroll down to ‘Image Time Settings \ Terminal Services \ Deny TS Connections’

wicd-11

Change this setting to false, and you’re set.  Now Enhanced VM Connection will work out of the box for any VMs deployed with this image.

Timezone

We can’t all live in Pacific coast time, and I personally hate seeing the System Clock set to the wrong time.  I’ll assume you all live on the ‘Right Coast’ like I do :p

Scroll down to Image Time Settings \ Shell \ TimeZone

wicd-12
One of the more finicky fields, be sure to exactly type your TimeZone name here

You’ll need to properly type your timezone name here.  I’ve seen it be VERY finicky, so use this list to make sure you get the desired timezone correct!  If you need to customize this based on multiple office locations, you’ll be better off looking at MDT, which can very easily configure this setting dynamically.

New User

In order to silently deploy this image, you must provide at a minimum the default user account.  Once we’ve done this, we can proceed to the next step of disabling the OOBE wizard.  But first things first, let’s setup a user.  Scroll down to Runtime Settings \ Accounts | Users  > User Name

wicd-13
Enter the name of this image’s default user

As seen before, this will add a new node with some more configuration options.  At a minimum, you must specify a password and which group to stick this user in.

wicd-14
This should be the DEFAULT user.  The password you save here can be recovered, so don’t make it your domain-admin password

Finally, choose which group to put this user into.

wicd-15

With this setting completed, we can now disable the install wizard and have a completely silent, unattended install experience.

Enabling Unattended mode

If you scrolled down to this point, make sure you specified a User Account first, otherwise this next setting will not do anything.

To enable unattended mode–truly silent Windows Installs!–we need to hide the Windows Out Of Box Experience.  Do this by scrolling down to Runtime Settings \ OOBE \ Desktop \ Hide OOBE > TRUE.

wicd-16
This setting only works if you create a user account!!

Turn on Windows Defender & auto-update

With these settings out of the way, now I’ll walk through some of my favorite and must-have settings for Windows Images.  I absolutely hate connecting to a VM and seeing this icon in the corner.

def
The red X Windows Defender icon

You’ll see this icon for a lot of reasons, but I normally see it if an AV scan has never run on a machine or if the definitions are too old.  It will typically resolve itself within a few hours, but when I’m automating Windows Deployments I almost always have someone connecting to a machine within a few hours, and have to answer support calls.

No more.  Scroll down to Runtime \ Policies \ Defender and set the following settings, which will run a QuickScan after Windows Install completes, and tell the definitions to update quickly.

Allow On Access Protection – Yes
RealTimeScanDirection – IncomingFiles
ScheduleQuickScanTime – 5 mins
SignatureUpdateInterval – 8 hours

Join to a domain while imaging

This is a simple setting but you’ll want to be careful that you don’t bake in a Domain Admin level account.  You should follow established guides like this one to be sure you’re safely creating a Domain Join Account.  Once you’ve done that, scroll down to Runtime Settings \ Account \ Computer Account and specify the following.

Account – Domain\DomainJoinAccount (insert your account name here!)
AccountOU – DestinationOU (Optional)
ComputerName – Want to change the computer name?  You can!  I use FOX-%RAND:5% to make computers name FOX-AES12 or other random names. (optional)
DomainName – Domain to join
Password – Domain Join Account Password

How to save this as a image

Once you’re satisfied with all of your changes, it’s time to export our settings and get to imaging.  Click Create \ Clean Install Media, from the top of the WICD toolbar.

wicd-21

Be sure to chose WIM format, then click next.

wicd-22

WICD has a super cool feature, it can directly create a bootable Windows 10 thumbdrive for you!  AWESOME!  So if you’re happy building systems this way, go for it!  If you’d instead like to make a bootable ISO, select ‘Save to a folder’ instead.

wicd-23

Assuming you choose to save to a folder, provide the path on disk for the files.

wicd-24

Remember to click Build, or you can sit here at this screen for a LONG time!

wicd-25
Click ‘BUILD’ or nothing will happen!!

When this completes, you’ll have a folder like this one, which looks exactly like what you see when you mount a Windows Install disk.

file-on-disk

We can now edit the files here on our build directory before we package it up in an image!

Optional: Add files to the image

One thing I like to do on all of my images is include a good log file viewer.  If you’d like to add some files to be present on your machines imaged with this WIM, give this a shot.

First, create a directory to mount the file system from the .WIM file.  I made mine at C:\Mount.

Next, browse out and find the install.wim we just saved in the last step, mine is in C:\temp\2016LTSBCustom

Now…to mount the filesystem.

Dism /Mount-Image /ImageFile:C:\temp\2016LTSBcustom\sources\install.wim /index:1 /MountDir:C:\Mount
wim
I love loading gifs

With this done, we can now browse out to the disk and we’ll see the install.wim file we just created earlier, as it will be expanded out on disk.  This is what it’s going to look like when Windows has finished installing using our image!

It’s such a pristine filesystem, just as it would be when freshly imaged!

file

Feel free to stage any files on disk, folders, you name it.  Go crazy here.  You can install portable apps and point it to the locations on this new Windows image.  Or you could copy your companies branding and logos down onto the machine, add a bunch of data or files you need every machine to have.  The sky is the limit.

For me, it’s enough to copy CMtrace.exe into the C:\mount\Windows\system32 folder, to ensure that it will be on disk when I need it!

If this good enough, scroll down to Pack up the image, or you could…

Optional: Make Registry Changes on the image

While we have the filesystem expanded on our PC, you can also stage registry settings too!  That’s right, you can edit the registry contained within a .wim file!  Awesome!

Most people don’t know it, but the registry is just a couple of files saved on disk.  Specifically, they’re found at C:\Windows\system32\config.  That means in our expanded image, it will be found at c:\mount\Windows\system32\config.  Windows-chan is very shy and doesn’t want you peeking under her skirt, so she makes you make SURE you know what you’re doing.

Be gentle Senpai!
 Senpai! *slaps hand*


file3

These translate like so:

HKEY_LOCAL_MACHINE \SYSTEM                    \system32\config\system
HKEY_LOCAL_MACHINE \SAM                           \system32\config\sam
HKEY_LOCAL_MACHINE \SECURITY                 \system32\config\security
HKEY_LOCAL_MACHINE \SOFTWARE               \system32\config\software
HKEY_USERS.DEFAULT                                         \system32\config\default

We can mount these guys into our own registry and mess with them using Regedit!  Cool!  As an example, to mount the Default User’s Profile for our new Image, you’d run:

reg load HKLM\Mount c:\mount\windows\system32\config\default

When that completes, we can open regedit and…

I don't know about you, but I think this is SOO cool!
I don’t know about you, but I think this is SOO cool!

When you’re done hacking around, you can save the settings by running:

reg unload HKLM\Mount

Now, we’re almost done…

Packing up the image

We’ve made all of our changes, but still have the .WIM opened up on our computer, mounted at c:\Mount.  To save the changes back into a .WIM file, run this command.

dism /unmount-wim /mountdir:C:\Mount /commit

Here’s the output….

unmount

And now, the very final step.

Convert to a bootable ISO

With all of our  changes completed, it’s time to take our file structure on disk and make it into a bootable ISO file for mass deployment.  You could spend hours fumbling around…or just use Johan’s awesome script, available here!

And that’s it?  Any other must have automation tips you think I missed?  Let me know!  Of course, if you want to REALLY automate things, you need to look at WDS, MDT, or SCCM!  But for test lab automation, these settings here have saved me a load of time, and I hope they help you too!


Locking your Workstation with PowerShell

$
0
0

locking-your-workstation

Locking a workstation using PowerShell?  It sounds like an easy task, right?  That’s what I thought too…and told the customer…but NO!  Friends, it wasn’t easy…before now.

As it turns out, some tasks in Windows just aren’t accessible via WMI.  For instance, the useful Win32_OperatingSystem class has some nifty methods for working with the system’s power state, like Reboot and Shutdown…but strangely none for locking the system!

01

Then I stumbled upon this useful post by Ed over at The Scripting Guys, but this was back in the dark ages of VBScript, and unfortunately the only answer they found was to use Rundll32.exe to call a method in a dll and that, frankly will not fly.  You’ll hear the shrillest high and lowest lows over the radio, and my voice will guide you home, they will see us waving from such great heights–

Sorry, that phrase is still a trigger word for me and takes me back to my deeply embarrassing emo phase…moving right along.

How to work with native methods easily in PowerShell

If you want to know how this is done…stop right here and read this awesome blog post by Danny Tuppenny on the topic.  It’s eye-wateringly in-depth.  But if you just want an example of how it is done, lets proceed.

Now, we all know by now that we can use Add-Type to work with native C# code…but the brilliant thing that Danny did is create a function which just makes it very easy to import a dll and get at the methods within…then surface those methods as a new class.  It’s the bomb.com.

# Helper functions for building the class
$script:nativeMethods = @();
function Register-NativeMethod([string]$dll, [string]$methodSignature)
{
    $script:nativeMethods += [PSCustomObject]@{ Dll = $dll; Signature = $methodSignature; }
}
function Add-NativeMethods()
{
    $nativeMethodsCode = $script:nativeMethods | % { "
        [DllImport(`"$($_.Dll)`")]
        public static extern $($_.Signature);
    " }

    Add-Type @"
        using System;
        using System.Runtime.InteropServices;
        public static class NativeMethods {
            $nativeMethodsCode
        }
"@
}

With that done, we’ll now have some a function available to us, Register-NativeMethod. To use this, we simply provide the name of the .dll we want to use, and then what’s known as the method signature. For instance, let’s say I wanted to use User32.dll to move a window, as described here. Here’s the method signature for that method.

BOOL WINAPI MoveWindow(
  _In_ HWND hWnd,
  _In_ int  X,
  _In_ int  Y,
  _In_ int  nWidth,
  _In_ int  nHeight,
  _In_ BOOL bRepaint
);

The hWnd is kind of a special variable, it means HandlerWindow, or MainWindowHandle. You can get a MainWindowHandle by running Get-Process Name | select MainWindowHandle. All of the other values are just integeres, so that would be the window position in X and Y and the width and height. Finally, you can provide a true, false value with bRepaint (but I didn’t bother).

We can implement this in PowerShell by using the Register-NativeMethod function, like so:

Register-NativeMethod "user32.dll" "bool MoveWindow(IntPtr hWnd, int X, int Y, int nWidth, int nHeight)"

Finally, we call it like so:

#Find the first Notepad process' MainWindowHandle
$Handle = Get-Process notepad | select -first 1 -expand MainWindowHandle
[NativeMethods]::MoveWindow($Handle, 40, 80, 400, 400)

And here’s how it looks in practice.

gif

If you’d like to know what other Methods are available, you can turn to the lovely Pinvoke website which has a listing of every method available from all of these dlls.  And you can just plug and play them all, easily!

Particularly of note are methods in user32.dll and kernel32.dll, but deep-linking doesn’t work, so you’ll have to click the dll name on the left column.

But what about locking the WorkStation?

I didn’t forget about you!  To lock the workstation, run

Register-NativeMethod "user32.dll" "bool LockWorkStation()"

#Calling the method to lock it up
[NativeMethods]::LockWorkStation()

Complete Code

# Helper functions for building the class
$script:nativeMethods = @();
function Register-NativeMethod([string]$dll, [string]$methodSignature)
{
    $script:nativeMethods += [PSCustomObject]@{ Dll = $dll; Signature = $methodSignature; }
}
function Add-NativeMethods()
{
    $nativeMethodsCode = $script:nativeMethods | % { "
        [DllImport(`"$($_.Dll)`")]
        public static extern $($_.Signature);
    " }

    Add-Type @"
        using System;
        using System.Runtime.InteropServices;
        public static class NativeMethods {
            $nativeMethodsCode
        }
"@
}


# Add methods here

Register-NativeMethod "user32.dll" "bool LockWorkStation()"
Register-NativeMethod "user32.dll" "bool MoveWindow(IntPtr hWnd, int X, int Y, int nWidth, int nHeight)"
# This builds the class and registers them (you can only do this one-per-session, as the type cannot be unloaded?)
Add-NativeMethods

#Calling the method
[NativeMethods]::LockWorkStation()

Registering for WMI Events in PowerShell

$
0
0

registering-for-wmi-events

An alternate title might be ‘Running PowerShell Code ONLY when the power state changes’, because that was the very interesting task I received from my customer this week.

It was honestly too cool of a StackOverflow answer NOT to share, so here it goes, you can vote for it here if you thought it was worth-while.

If you want your code to trigger only when the System Power State changes, as described here, use this code.


Register-WMIEvent -query "Select * From Win32_PowerManagementEvent" `
 -sourceIdentifier "Power" `
 -action {
     #YourCodeHere
      }

Now, this will trigger whenever the power state changes, whether you plug the device in, OR unplug it. So you might further want to stop and pause to ask the question:

Am I on power or not?

Fortunately we can use the WMI Class Win32_BatteryStatus to detect if we’re charging or not, so here’s the full construct that I use to ONLY run an operation when a power event changes, and then only if I’m no longer on Power.

Locking the workstation when the system is unplugged


Register-WMIEvent -query "Select * From Win32_PowerManagementEvent" `
  -sourceIdentifier "Power" `
  -action {
      if ([BOOL](Get-WmiObject -Class BatteryStatus -Namespace root\wmi).PowerOnLine ){
         #Device is plugged in now, do this action
         write-host "Power on!"
     }
    else{
        #Device is NOT plugged in now, do this action
        write-host "Now on battery, locking..."
        [NativeMethods]::LockWorkStation()
     }

If you’re curious how this looks in real time

Registering for device events

It can also be useful to have your code wait for something to happen with devices, such as running an action when a device is added or removed. To do this, use this code.


#Register for power state change
#Where TargetInstance ISA 'Win32_Process'"
Register-WMIEvent -query "Select * From Win32_DeviceChangeEvent where EventType = '2'" `
-sourceIdentifier "Power" `
-action {#Do Something when a device is added
Write-host "Device added at $(Get-date)"
}

You might also want to do an action if a device is removed instead, so use this table to choose which event is right for you. Read more about it here.

EventType Id
ConfigurationChanged 1
Device Arrived 2
Device Removed 3
Device Docked 4

What else can I wait for?

Not only these, but you can trigger your code to execute on a variety of useful WMI Events, all of which can be seen in this image below!

ClassName Triggers when
Win32_DeviceChangeEvent  A device is installed, removed, or deleted, or the system is docked
Win32_VolumeChangeEvent Something happens to your disk drives
Win32_PowerManagementEvent Your device is plugged, unplugged or docked
Win32_ComputerSystemEvent Something major happens to the system
Win32_ComputerShutdownEvent The system is shutting down!
RegistryEvent Anythign happens to the registry
RegistryKeyChangeEvent A reg key you specify is changed
RegistryValueChangeEvent A reg value you specify is changed

Tool-highlight: Show Windows Toast Messages with PowerShell

$
0
0

Happy New Years, everyone!

This will be a quick post here, but I just wanted to shine a spotlight on an AWESOME tool that I absolutely love: Joshua King’s ‘BurntToast’ PowerShell module, which makes the arduous task of rendering a Windows Toast notification VERY Easy.

Check out his GitHub repo here, and view the module’s page on the PowerShell gallery here.

Here’s an example of what I’m talking about

en

Why might I want to use this?

Any time you want to provide data to the end-user, but not require them to drop everything to interact. I don’t know about you, but I really dislike alert dialog boxes.  Especially if they lock my whole desktop until I quickly ignore it and click the ‘X’ button…err, read it.

I also believe that toasts are what users expect, especially to receive updates from long-running scripts.  They really do provide a polished, refined look to your scripts.

Finally, you can also provide your own image and play your own sound effects too!

Real-time encryption notices

At a current customer, we’re deploying a device management profile using MDM to use BitLocker encryption on these devices.  We decided that it would be very useful to be able to see updates as a device was encrypting, so I wrote up this script around the BurntToast tool.

install-module BurntToast -Force
Import-module BurntToast

$EncryptionStatus = Get-BitLockerVolume -MountPoint c:

    While ($EncryptionStatus.VolumeStatus -eq 'EncryptionInProgress'){

        if (($EncryptionStatus.EncryptionPercentage % 5)-eq 0){
            New-BurntToastNotification -Text 'Encryption Progress', "Now $($EncryptionStatus.EncryptionPercentage)% completed."
        }

        Start-Sleep -Seconds 30

        $EncryptionStatus = Get-BitLockerVolume -MountPoint c:
        Write-host $EncryptionStatus.EncryptionPercentage
        }

New-BurntToastNotification -Text 'Encryption Completed' 'Now completed.' -Image "C:\Users\sred1\Dropbox\Docs\blog\foxderp - Copy.png"

And a screen shot of it in action!

encryption-percentage


Viewing all 90 articles
Browse latest View live